
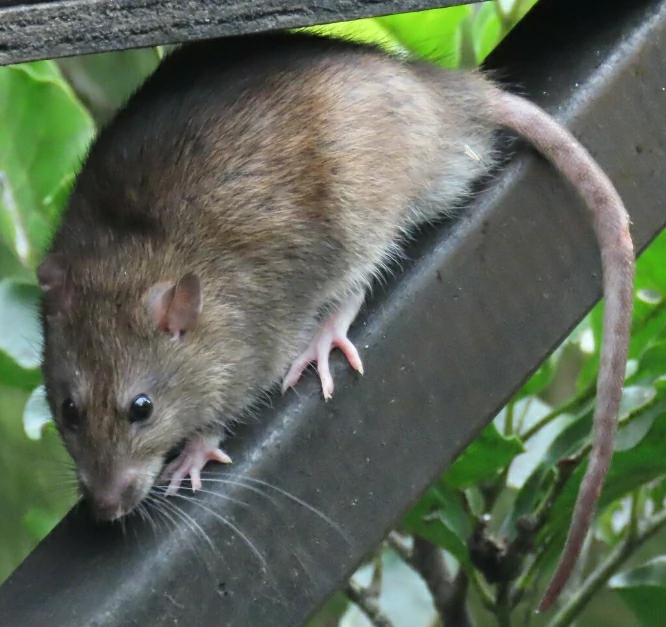
Rats don’t wait for a good time to move in, and not everyone can run to the hardware store. So, how do you make a homemade rat trap using a bottle?
You can make a rat trap using a bottle three ways: a spinning bottle over a deep bucket, a funnel from a big water jug, or a bottle tunnel around a snap trap. A small 2-liter funnel only catches mice.
Each design uses an ordinary bottle in a different way. Three of them catch a rat alive, and one simply makes a store-bought snap trap safer to use.
Below, you’ll find how to build each one, which rodents it fits, and where bottle traps fall short (that last part matters most).
Can a Bottle Trap Really Catch a Rat?
Yes, it can, but only if you know the limits, because a bottle is just a container and everything depends on how you set it up.
Most bottle traps catch the rat alive, which leaves you with a scared animal to deal with afterward (we’ll cover that later). You also won’t find much scientific testing of homemade bottle traps.
Snap traps are the safest, most effective, and cheapest way to trap rats, so keep that in mind as you read.
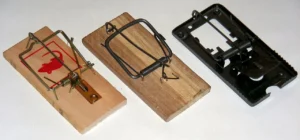
Size is another problem, since a full-grown Norway rat averages about 16 inches from nose to tail (tail included) and a small soda bottle just isn’t built for that.
Then there’s chewing, because rats can gnaw through plastic, foam, wood, and even caulk (a big deal for a plastic trap).
That’s why you should check every bottle trap daily and treat it as a short-term fix.
However, a well-built bottle trap can still catch a rat, and the next few sections will help you pick the right one.
How to Tell Rats From Mice Before You Pick a Bottle Trap
The right bottle depends on who’s living in your walls. A trap built for a rat won’t do much for a mouse (and the other way around).
In the US and Canada, you’ll most likely come across Norway rats and roof rats (in the UK and Australia, people usually call them brown rats and black rats).
Norway rats are stocky and dig burrows along building foundations, under rubbish, or in woodpiles, and indoors they stick to basements and ground floors.
Roof rats are leaner, with a tail longer than their head and body together. They’re great climbers, so you’ll usually find them in attics and upper floors.
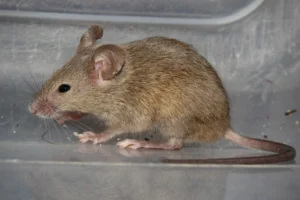
House mice are much smaller (they can squeeze through gaps just over half an inch wide). They’re also far more common, with some pest guides putting mouse problems at 10 to 20 times more common than rat problems.
So if you only find droppings and never see the animal, you may well have mice, and a 2-liter bottle trap would suit them just fine.
For rats, look for droppings in garages, sheds, or around pet food bowls. Also check for gnawed fruit or nuts in your yard, burrows under garbage cans, and rats running along fences at dusk.
Wherever you find those signs is where your trap should go.
How to Make a Spinning Bottle Trap Over a Deep Bucket or Trash Can
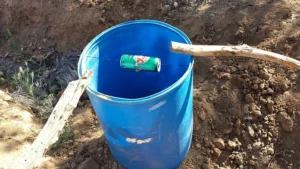
This is the best-known homemade rat trap using a bottle, and it’s the one you’ll find in most videos. A bottle spins on a rod over a deep container, and the rat falls in when it steps on it.
You’ll need a tall container, such as a 32-gallon trash can or a 55-gallon drum, since a regular bucket is too short for adult rats. (A 5-gallon bucket is fine if you’re only after mice.)
You’ll also need an empty 2-liter bottle with the cap on, a stiff metal rod (a straightened wire coat hanger works), a drill, a long board, and some peanut butter.
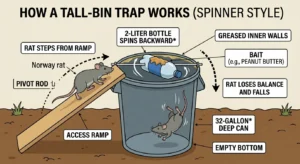
First, drill a hole through the container just below the top edge, then drill a second hole straight across from it.
Next, drill a small hole through the center of the bottle cap and another through the center of the base, so your rod can slide through both with room to spare.
Then push the rod through the container, the bottle, and out the other side, and bend both ends so it can’t slip out.
Give the bottle a spin with one finger. It should turn easily, and if it sticks, widen the holes a bit.
Finally, lean the board against the container so the top end reaches the bottle, then smear peanut butter across the bottle and lay a little trail of bait up the board.
Here’s how it works: a rat runs up the board and steps onto the bottle, the bottle spins, and the rat drops in.
Coat the upper inside walls with oil or petroleum jelly before you set it, and keep the bottom empty. That way the rat has nothing to push off from.
Check it first thing every morning. For the first few nights, tape the bottle so it can’t spin and let the rats get used to it.
Setting it outdoors? Put it out at night only, since that keeps songbirds and other wildlife from getting caught.
How to Build a Big Water Jug Funnel Trap for Adult Rats
Funnel traps work on a simple idea: it’s easy to walk in, but hard to walk back out. A big water jug is one of the few bottles large enough to try this on an adult rat.
You’ll need an empty 5-gallon water cooler jug, a box cutter, strong tape or zip ties, and some bait (rinse the jug well with plain water first so there’s no soapy smell).
Lay the jug on its side and mark a line where it starts to narrow near the top. Then cut off the neck and shoulder section.
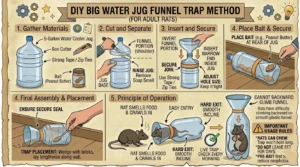
Flip that piece around so the narrow end points inside the jug like a funnel. Tape or zip tie it in place so nothing can slip through the seams.
Now check the hole at the tip of the funnel. It should be about 2 inches wide, which is a tight fit for a grown rat.
If rats keep sniffing around without going in, widen the hole a little at a time, because if it’s too wide, they’ll just walk right back out.
Put bait at the closed end of the jug and a few crumbs near the opening to lead rats in. Then lay it lengthwise along a wall and wedge it with bricks so it can’t roll.
The big weakness is the plastic. Rats can chew through it, so this trap can’t hold a rat for long, and you shouldn’t leave it set for days.
Check it every morning, and pre-bait first with the open jug on its side and food inside, so the rats get used to it before you add the funnel.
Can You Make a Funnel Trap From a 2-Liter Soda Bottle?
Yes, you can, but it works on mice, not full-grown rats, because the opening of a 2-liter bottle is too small for an adult.
The build is the same as the jug. Cut off the top third of the bottle, flip it so the neck points inward, and tape it down.
Put a spoonful of peanut butter at the bottom and lay the bottle on its side along a wall, with a strip of cardboard leaning up to the opening as a ramp.
Mice can slip in through the neck, and the slick sides make it hard to climb back out. Half-grown rats may fit if you widen the opening a little, but adults won’t.
It’s also a cheap way to find out what’s in your walls, since catching a mouse in a night or two tells you exactly what you’re up against.
Thin soda bottle plastic is easy to chew, though, so check it daily just like the bigger traps.
How to Turn a Cut Bottle Into a Safe Tunnel for a Snap Trap
This one isn’t a trap you build from scratch. It’s a way to use a bottle to make a store-bought snap trap safer and more effective.
A bottle tunnel helps in two ways: it keeps kids and pets away from the trap, and it gives the rat a dark, tight path that feels like a hiding spot.
You’ll need a large bottle (a 2-liter works), a box cutter, tape, and a rat-sized snap trap, since mouse traps are too small.
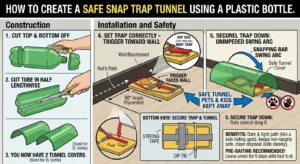
Cut the top and bottom off the bottle, then cut the tube in half the long way to make two curved covers.
Set the snap trap the way the box says, with the trigger end touching the wall. Pest pros place traps at a right angle to the wall, with the trigger toward the baseboard.
Slide the half-bottle over it so the tunnel opens along the rat’s path. Make sure it sits high enough that the snapping bar can swing free.
Then tape or zip tie the trap down so a rat can’t drag it away.
Put it out unset first, with a little bait, for about 5 days. Once rats are feeding, set it with just a small piece of bait.
Of all four designs, this is the one most likely to catch an adult rat, and it’s the only one that doesn’t leave you with a live animal to deal with.
Bottle Trap Comparison: Which One Fits Rats, Young Rats, or Mice?
Here’s a quick look at how the four designs compare:
| Trap | Best for | How it catches | Main downside |
|---|---|---|---|
| Spinning bottle over a deep can | Adult rats | Alive, in a dry, tall container | Needs a drill and a tall, slick container; a regular bucket won’t hold an adult rat |
| Big water jug funnel | Adult rats | Alive, inside the jug | Rats can chew the plastic; the entry hole takes trial and error |
| 2-liter funnel | Mice and half-grown rats | Alive, inside the bottle | Too small for adult rats |
| Bottle tunnel over a snap trap | Adult rats | Quick kill from the snap trap | Needs a store-bought rat trap |
If you only remember one thing from the table, make it this. Bottles on their own work best on mice, while a bottle tunnel around a snap trap works best on adult rats.
Where Should You Put Each Bottle Trap?
Rats like to stay close to walls, and they use the same paths again and again. You’ll do best setting traps along a wall, a fence line, or another straight edge, like the side of a planter.
With the spinning bottle trap, push the container flat against the wall. Then lean the board against it from the side where rats usually come from.
The water jug goes lengthwise against the wall, with the funnel facing the way rats travel (a corner behind a stack of boxes or a water heater is a great spot).
For the 2-liter funnel, think small spaces, like under the sink, behind the stove, or inside a garage cabinet.
The snap trap tunnel sits at a right angle to the wall, with the trigger end against the baseboard. Droppings and gnawed boxes will show you where the path runs.
Roof rats are the exception, since they travel off the ground. You’ll want to look at ledges, shelves, branches, fences, pipes, or overhead beams.
A heavy container won’t work up there, so for roof rats it’s easier to put a bottle tunnel and snap trap on a ledge or beam.
What Bait Works Best for Rat Traps?
Peanut butter is the classic, and it works because it’s sticky and strongly scented. However, rats eat almost anything, so it pays to try more than one.
Meat scraps, candy, fruit, and nuts all work too (a few walnuts or a bit of cooked bacon are good examples). Whatever you pick, change it daily so it stays fresh and smelly.
Press the bait in well so a rat has to work for it, because you don’t want it to grab a snack and run.
It also helps if you set out several traps rather than one, whether that’s in trees and shrubs for roof rats or on the ground for Norway rats.
Common Mistakes That Make Bottle Traps Fail (And Easy Fixes)
Most bottle traps that catch nothing share the same few problems, and the good news is that each one is easy to fix.
- The container is too short. An adult rat can leap 2 to 3 feet, so a 14-inch bucket won’t hold it. Use a deeper container with slick walls.
- The bottle sticks. If the spinning bottle drags on the rod, a rat can just walk right over it. Widen the holes until it spins with one light touch.
- You skipped pre-baiting. Rats are wary of new things, so a trap that shows up overnight often gets ignored (for example, a new bottle in their usual path).
- There’s too much bait. A big blob of peanut butter lets a rat eat from the edge without touching the trigger. Use a pea-sized amount once the trap is set.
- The trap sits in the open. Rats hug walls, so a trap in the middle of the floor gets skipped. Moving it against a wall can make all the difference.
- The bait is stale. Dry peanut butter and old fruit lose their smell, so swap them out daily.
- Nobody checks the trap. Plastic doesn’t hold a rat for long, and a live rat left for days suffers. Check it every morning.
- You think your scent is the problem. Human scent doesn’t keep rats away from traps, but it’s still smart to wear gloves since rats can carry diseases.
How Can You Keep Kids and Pets Safe Around Bottle Traps?
Homemade traps don’t come with warning labels, so safety is up to you. The biggest risks are curious kids, dogs, and cats.
A deep container can be risky for small children, even when it’s dry, so keep it out of reach (a closed-off basement works).
Dogs and cats may knock over a bottle trap or go after the bait, so you’ll want to set traps where pets can’t reach (behind appliances or inside a closed room, for example).
Snap traps are the hardest on fingers and paws. A bottle tunnel helps by covering the trap, but don’t count on it alone.
Put outdoor traps out at night and pick them up in the morning, which also keeps birds and other wildlife out of harm’s way.
What Should You Do With a Rat Once You’ve Caught It?
This is the part most videos skip, but catching a rat alive is only half the job.
Never open a trap with bare hands, since rats can spread diseases and a scared rat will bite.
Releasing it isn’t a good fix either. UK rat-control guidance published with the journal Animal Welfare says releasing rats isn’t recommended because an unfamiliar place can cause suffering, and in the UK it could even be against the law.

Rules vary, so check yours first. A vet, an animal shelter, or a pest control company can humanely put the rat down, and drowning isn’t an acceptable method.
Then comes the cleanup, and this part is important. The CDC says some rodents carry hantavirus, which people can catch by breathing in dust from dried droppings, urine, or nests.
So wear rubber or plastic gloves, and don’t sweep or vacuum, since that just throws dust into the air.
Instead, spray the rat, the droppings, and the trap with a bleach mix of 1 part bleach to 9 parts water (that’s 1½ cups of bleach in a gallon). Let it soak for about 5 minutes.
Wipe it up with paper towels, then seal the rat and towels in a plastic bag and put that bag inside a second bag before it goes in the trash.
Finally, wash your gloved hands, take the gloves off, and wash your hands again with soap and warm water. Disinfect the container before you reuse it.
Should You Skip Bottle Traps and Use a Snap Trap Instead?
Honestly, for most people, yes. Snap traps are cheaper, faster, and more proven, and a bottle trap can’t beat that.
Bottle traps do have a place, though, since they’re cheap, they catch rats alive, and a bottle tunnel can make a snap trap safer.
However, traps alone won’t fix a rat problem, because if rats have food and a way in, new ones will take the place of the ones you catch.
Seal gaps with steel wool, lath metal, or caulk. Keep pet food in containers rodents can’t get into, and trim tree limbs that sit within 3 feet of your roof.
Skip homemade poison stations, too. Rats that eat poison can die inside your walls, which makes a terrible smell, and kids or pets can reach a homemade station.
If you’re still seeing signs after a couple of weeks of steady trapping, call a licensed pest professional, since a big or long-running problem usually needs one.
Conclusion
You can make a homemade rat trap using a bottle, but not every bottle design works on every rodent. A spinning bottle over a deep trash can and a big water jug funnel can catch adult rats alive.
A 2-liter bottle funnel only works on mice and maybe half-grown rats, and a cut bottle tunnel turns a snap trap into a safer, better trap.
Whichever you pick, pre-bait for about a week, put traps where rats already travel, and check them every morning.
Rats can jump, climb, and chew, so don’t count on a regular bucket or thin plastic to hold one for long.
Finally, plan for what happens after the catch. Wear gloves, clean up with bleach, and never open a trap with bare hands.
Seal the holes, store food well, and a few good traps can finish what you started.

Hi, my name is Ezra Mushala, i have been interested animals all my life. I am the main author and editor here at snakeinformer.com.