
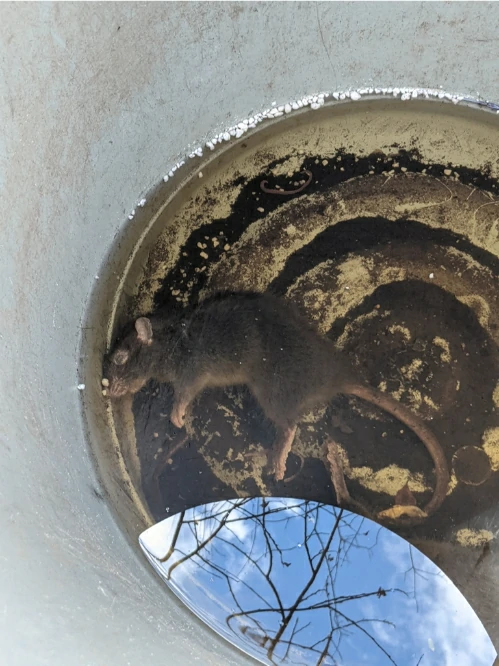
Rats can be a serious problem in homes, garages, barns, and outdoor spaces. If you’re dealing with a rat infestation and want a cheap, effective solution, a bucket rat trap might be exactly what you need.
These traps are simple to build, use materials you probably already have at home, and can catch multiple rats in one night. But how exactly do you make a bucket rat trap that actually works?
To make a bucket rat trap, you’ll need a 5-gallon bucket, a wooden dowel or wire, a soda can or bottle, some bait, and a ramp. The can spins on the dowel when the rat steps on it, causing the rat to fall into the bucket. You can fill the bucket with water to drown the rat or leave it dry for a live catch.
This type of trap has been used for years by farmers, homeowners, and pest control professionals because it’s reliable and doesn’t require any special tools or expensive materials.
Once you understand the basic design, you can build one in less than 30 minutes.
What You’ll Need to Build a Bucket Rat Trap
Before you start building, gather all your materials. Most of these items are things you might already have around the house, which makes this trap very budget-friendly.
You’ll need a 5-gallon bucket. This is the main body of the trap where the rats will fall. A standard plastic bucket works perfectly.
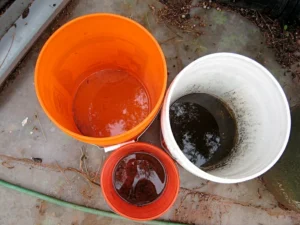
You can use a smaller bucket if you want, but a 5-gallon size gives you more room and allows you to catch multiple rats without having to empty it constantly.
Next, you’ll need something for the spinning mechanism. A wooden dowel that’s about 12-14 inches long works great. You can also use a stiff wire or a metal rod.
The dowel needs to be long enough to rest across the top of the bucket with a little bit hanging over each side.
For the spinning part, grab an empty soda can or plastic bottle. An aluminum soda can is ideal because it’s lightweight and spins easily. Make sure it’s completely empty and dry before you use it.
You’ll also need bait. Peanut butter is the best option because it smells strong and rats love it. You can also use bacon grease, sunflower seeds, or any other food that rats in your area have been getting into.
Finally, you’ll need a ramp. This can be a piece of wood, a stick, or even a stack of books. The ramp needs to lead up to the top edge of the bucket so rats can climb up and reach the trap.
Step-by-Step Instructions for Building the Trap
Start by drilling or punching a small hole through the center of the soda can. The hole needs to go all the way through both sides of the can.
This is where the dowel will go through, allowing the can to spin freely.
If you’re using a wooden dowel, you can drill the holes with a drill bit that’s just slightly larger than the dowel’s diameter.
If you’re using wire, you can punch holes with a nail or screwdriver. Just make sure the holes are centered so the can spins evenly.
Once the holes are ready, slide the dowel through the can. The can should spin easily on the dowel.
If it’s too tight and doesn’t spin, make the holes a little bigger. If it’s too loose and wobbles, that’s fine. It’ll still work.
Now, place the dowel across the top of the bucket. The ends of the dowel should rest on the rim of the bucket with the can hanging in the middle.
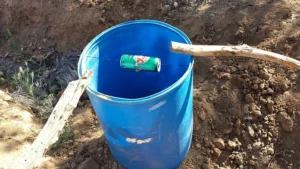
The can should be positioned right over the center of the bucket so when it spins, the rat falls straight down.
Some buckets have handles that get in the way. If this happens, you can either remove the handle or drill small notches on opposite sides of the bucket rim where the dowel can sit.
Next, spread peanut butter or your chosen bait all over the outside of the can. Don’t be shy with it.
The more bait you use, the more attractive the trap will be. The bait needs to be on the can itself, not on the dowel or the bucket.
Now set up your ramp. Lean a piece of wood or a sturdy stick against the side of the bucket so it reaches the rim.
The ramp should be stable enough that a rat can climb up without it falling over. If the ramp keeps slipping, you can secure it with tape or a small weight at the bottom.
How the Bucket Rat Trap Works
The design of this trap is clever because it uses the rat’s own weight and movement against it. Here’s what happens when a rat finds your trap.
The rat smells the bait and follows the scent to the ramp. It climbs up the ramp to the top of the bucket, where it sees the can covered in peanut butter.
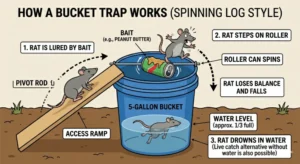
Rats are excellent climbers, so getting to the top of the bucket isn’t a problem for them.
Once the rat is on the rim of the bucket, it reaches out to the can to get the bait. As soon as the rat puts its weight on the can, the can starts to spin. The rat loses its balance and falls into the bucket.
If you filled the bucket with water, the rat drowns. If you left the bucket empty, the rat is trapped alive. Either way, the can resets itself after the rat falls, which means the trap is ready to catch another rat immediately.
This is why bucket traps are so effective. You can catch multiple rats in one night without having to reset anything. If you have a serious rat problem, this is a huge advantage over traditional snap traps that only catch one rat at a time.
Should You Use Water in the Bucket?
This is a personal choice, and there are good arguments for both options. If you fill the bucket with 4-6 inches of water, the rat will drown within a few minutes.
This is a faster death than leaving the rat trapped alive in an empty bucket, where it might suffer from stress, dehydration, or injuries from trying to escape.
Some people add a small amount of antifreeze to the water to keep it from freezing in cold weather, but this is dangerous if you have pets or wildlife that might drink from the bucket.
If you live in a cold area, it’s safer to just use more water or check the trap more frequently.
On the other hand, if you want to release the rats somewhere far from your property, you’ll need to use an empty bucket. Just be aware that releasing rats often doesn’t solve the problem.
Rats are territorial, and if you release them in an area where other rats already live, they’ll either die from fights or starvation. They also might just find their way back to your property.
If you do use an empty bucket for live catches, you need to check the trap at least once a day. Leaving a rat trapped for too long without food or water is inhumane.
Where to Place Your Bucket Rat Trap
Location is everything. You can build the perfect trap, but if you put it in the wrong spot, you won’t catch anything.
Start by looking for signs of rat activity. Rats leave droppings, gnaw marks, greasy smudge marks along walls, and small runways in grass or dirt. If you see these signs, you’ve found an active area.
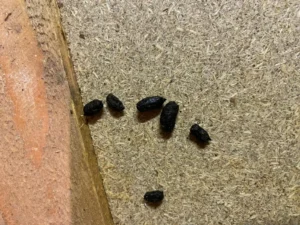
Place your bucket trap along walls or in corners where you’ve seen the most activity. Rats prefer to travel along edges rather than crossing open spaces, so a trap against a wall is much more likely to be used than one sitting in the middle of a room.
If you’re using the trap outdoors, put it near rat burrows, compost piles, garbage cans, bird feeders, or anywhere else rats are getting food.
Make sure the trap is on level ground so the bucket doesn’t tip over.
You can also place the trap near entry points. If rats are getting into your house through a hole in the foundation or a gap under a door, put the trap right outside that opening.
How to Make Your Bucket Trap More Effective
There are a few simple tricks you can use to increase your chances of catching rats. First, use the right bait. Peanut butter is the most popular choice, but you can also try bacon grease, hazelnut spread, or sunflower seeds.
If you know the rats have been getting into specific food (like dog food or birdseed), use that as bait.
You can also add something to the water to hide the fact that it’s there. Some people sprinkle sunflower seeds or straw on the surface of the water so it looks like solid ground. When the rat falls in, it’s already too late to react.
Another tip is to use multiple traps. If you’re dealing with a large rat population, one trap might not be enough.
Set up two or three bucket traps in different locations to catch more rats faster.
Make sure the trap is stable. If the bucket tips over or the ramp falls, rats won’t be able to use it. Test the setup before you leave it overnight.
Climb the ramp yourself (carefully) or press down on it to make sure everything stays in place.
What to Do After You Catch Rats
If you used water in the bucket, the rats will already be dead when you check the trap. Wear gloves and use a net or stick to remove the rats from the water. Place them in a plastic bag, seal it, and throw it in your outdoor trash.
If you used an empty bucket for live catches, you’ll need to decide what to do with the rats. Some people release them far from their property, but as mentioned earlier, this often just moves the problem somewhere else.

The most humane option for live-caught rats is euthanasia, but this requires special equipment or the help of a pest control professional.
After you’ve removed the rats, clean the bucket and reset the trap. Rats can smell the scent of other rats, and sometimes this will actually attract more rats to the trap.
However, if the smell becomes too strong or if there’s blood in the water, it might scare new rats away. Keep the trap clean for best results.
Common Mistakes to Avoid
One of the biggest mistakes people make is using a dowel or wire that’s too thin. If the dowel bends under the rat’s weight, the trap won’t work properly.
Use a dowel that’s at least 1/4 inch thick, or a wire that’s stiff enough to support the weight of a rat without sagging.
Another mistake is not using enough bait. A tiny smear of peanut butter isn’t going to attract rats from a distance. You want a thick coating all over the can so the smell carries.
Some people also make the ramp too steep or too unstable. If the ramp is too steep, rats won’t be able to climb it comfortably.
If it’s wobbly, they’ll avoid it because it doesn’t feel safe. The ramp should be at a gentle angle and firmly in place.
Don’t place the trap in direct sunlight if you’re using water. The water will evaporate quickly, and in hot weather, it can start to smell. If you’re using the trap outdoors, put it in a shaded area.
Finally, don’t give up too soon. Rats are cautious animals, and they might avoid a new object in their environment for a few days. If you don’t catch anything the first night, leave the trap set and give it more time.
Is a Bucket Trap Humane?
This depends on how you use it. A bucket trap with water is more humane than a glue trap, where the rat suffers for hours or days.
Drowning is faster and less painful than starvation, dehydration, or being stuck to a glue board.

However, it’s not as humane as a well-placed snap trap, which kills the rat instantly. If your main concern is being humane, a snap trap inside a tunnel trap is probably the best option.
If you use an empty bucket for live catches, remember that leaving a rat trapped for long periods is stressful and cruel. Check the trap frequently and deal with caught rats as quickly as possible.
How to Prevent Rats From Coming Back
Catching rats is only part of the solution. If you don’t fix the conditions that attracted them in the first place, new rats will just move in to replace the ones you caught.
Start by sealing entry points. Rats can squeeze through holes as small as a quarter, so inspect your home carefully.
Look for gaps around pipes, vents, doors, and windows. Use steel wool, metal mesh, or caulk to block these openings. Rats can chew through wood, plastic, and even soft metals, but they can’t chew through steel.
Remove food sources. Don’t leave pet food out overnight, store pantry items in sealed containers, and keep your trash cans tightly closed. If you have fruit trees, pick up fallen fruit every day. Compost piles should be turned regularly and kept away from your house.
Eliminate water sources. Fix leaky pipes, outdoor faucets, and clogged drains. Don’t leave standing water in buckets, plant saucers, or birdbaths.
Keep your property clean and organized. Piles of wood, debris, or clutter give rats places to hide and nest. Trim back bushes and trees so they’re not touching your house. Rats use branches as pathways to get onto roofs and into attics.
Conclusion
A bucket rat trap is one of the easiest and most effective DIY traps you can build. With just a 5-gallon bucket, a wooden dowel, a soda can, and some peanut butter, you can create a trap that catches multiple rats without needing to be reset.
The key to success is placing the trap in the right location, using plenty of attractive bait, and making sure the ramp is stable and easy for rats to climb.
Whether you use water for a lethal trap or leave the bucket empty for live catches, this design takes advantage of rat behavior and works reliably.
Just remember that trapping alone won’t solve a rat problem permanently. You also need to seal entry points, remove food and water sources, and keep your property clean.
With the right combination of trapping and prevention, you can get rid of rats and keep them from coming back.

Hi, my name is Ezra Mushala, i have been interested animals all my life. I am the main author and editor here at snakeinformer.com.