

If you’ve noticed droppings, gnaw marks, or scratching in your walls, trapping is usually the fastest way to deal with a rat problem yourself.
But a lot of people set a trap, catch nothing for days, and give up thinking it doesn’t work. So what’s the simplest, most reliable way to trap rats?
The simplest way to trap rats is to place unset traps along walls near confirmed rat activity for a few days first, then bait and set them once the rats get used to them. Snap traps placed against walls, baited with peanut butter, catch rats more reliably than traps set randomly in open areas.
That first step, letting rats get comfortable with a trap before it’s even armed, is the part most people skip, and it’s the single biggest reason DIY trapping fails.
Once you understand why rats behave this way, the whole process gets a lot easier.
Why Are Rats So Hard to Trap at First?
Rats are naturally cautious animals, and pest control professionals have a specific word for it: neophobia, which just means a fear of new objects.
When a rat comes across something new in its territory, like a shiny trap that wasn’t there yesterday, its first instinct is to avoid it entirely. This isn’t the rat being clever or “smart enough to know it’s a trap.”

It’s just how rats are wired to survive. In the wild, an unfamiliar object could easily be a threat, so caution keeps them alive longer than curiosity does.
This is actually one of the biggest differences between rats and mice.
Mice tend to investigate new objects almost right away, while rats will often stop, back away, and choose a completely different path rather than go near something unfamiliar.
Most rats need several days to get used to a new object before they’ll approach it with any confidence. Understanding this single fact changes how you should approach trapping from the very beginning.
Signs You Actually Have Rats (Not Just One Visitor)
Before you start setting traps everywhere, it helps to confirm what you’re actually dealing with, since the signs of rats are pretty distinct once you know what to look for.
Droppings are usually the first thing people notice. Rat droppings are about the size of a raisin, dark brown to black, and tend to show up in clusters near food sources or along travel paths.
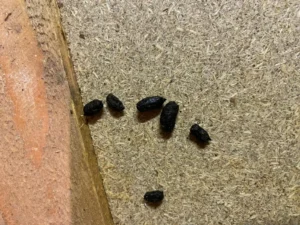
Gnaw marks are another dead giveaway. Rats have front teeth that never stop growing, so they gnaw constantly to keep them worn down, which often leaves fresh, light colored marks on wood, plastic, or even electrical wiring.
Grease marks are a subtler sign a lot of people miss. Rats have oily fur, and since they travel the exact same paths along walls over and over, you’ll often see a dark, greasy smudge built up right at rat height along a baseboard.
Scratching sounds in walls or ceilings, especially at night, are one of the more unmistakable signs. Since rats are nocturnal, this activity tends to pick up right around dusk and continue through the night.
If you’re noticing two or more of these signs in the same area, that’s a strong signal you’re dealing with an actual presence, not just a rat that wandered through once. That’s exactly the kind of spot where a trap has the best chance of working.
Pre-baiting means placing your trap in an active area without setting it, so rats can get used to it being there before it can actually catch anything.
Put the trap where you’ve seen droppings, gnaw marks, or grease smudges, then leave it unset with bait on it (or near it) for 2 to 4 days. Let the rats feed from it freely during this time.
Once rats are comfortably feeding at the trap without hesitation, that’s your sign. Bait it again, but this time, actually set it.
This single step dramatically increases your odds of a catch on the first real attempt, instead of scaring off every rat in the area with a trap that snaps and misses on day one. It takes a bit more patience, but it beats resetting an empty trap over and over for two weeks straight.
Choosing the Right Type of Trap
Not all rat traps work the same way, and picking the right one for your situation makes a real difference.
Snap traps are the classic choice, and for good reason. They’re affordable, reusable, and kill quickly when set and placed correctly, which many people consider the most humane option available.
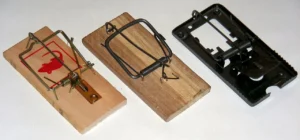
Electronic traps use a battery powered shock to kill a rat almost instantly once it steps inside. They’re more expensive than snap traps, but they’re clean to reset and don’t require you to handle a snapped trap by hand.
Live traps catch a rat without harming it, so you can release it elsewhere. These work fine, but they come with a real downside: you still have to deal with a live, stressed rat once it’s caught, and simply releasing it nearby often means it just finds its way back inside.
Glue traps immobilize a rat that steps onto the adhesive surface. Most pest control professionals actually steer people away from these, since they’re not selective (pets or other wildlife can get stuck too) and you’re still left dealing with a live, distressed animal afterward.
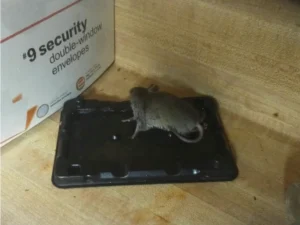
For most homeowners dealing with a small indoor problem, snap traps are the simplest and most reliable place to start.
Multi-catch traps are worth knowing about too, especially if you’re dealing with more than just one or two rats.
These are typically small enclosed boxes with a one-way entrance, designed to hold several rats at once without needing to be reset after every single catch.
They’re more common in commercial settings like restaurants or warehouses, but they can work well in a garage or basement with heavier activity.
The tradeoff is that most multi-catch traps don’t kill the rat, so you’re back to the same live-capture situation as a standard live trap, just with room for more than one at a time.
Where to Actually Place Your Traps
Trap placement matters just as much as trap choice, maybe even more. A perfectly good trap in the wrong spot will sit empty for weeks.
Rats travel along the same paths over and over, almost always hugging walls, pipes, and other continuous surfaces rather than crossing open floor space.
This is why the single best spot for a trap is longways against a wall, right where you’ve seen signs of activity.
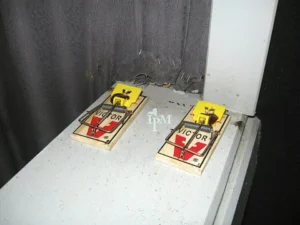
Look for droppings, gnaw marks, grease smudges along baseboards, or shredded material near potential nesting spots like under appliances, in cabinets, or behind stored boxes. These are the areas actually worth targeting, not just any random corner of a room.
Set your trap on a flat, stable surface so the trigger mechanism isn’t disturbed by an uneven floor. A wobbly trap can misfire or fail to snap properly even when a rat does step onto it.
If you’re dealing with an area with heavy activity, don’t just set one trap and wait. Spacing multiple traps 10 to 20 feet apart along the same wall or pathway gives you a much better shot at catching more than one rat before they catch on.
What’s The Best Bait for Catching Rats?
Despite what cartoons might suggest, cheese isn’t actually a great choice. Rats are drawn to food that’s high in calories, protein, or fat, so a few specific options consistently outperform the rest.
Peanut butter is the classic go-to for a good reason. It’s sticky enough to stay on the trigger, strongly scented, and hard for a rat to grab without setting off the trap.
Bacon, hot dogs, and other fatty meats work extremely well too, especially for outdoor or garage infestations where rats may already be used to scavenging.
Nesting material like cotton balls or shredded paper can also work, since it appeals to a rat’s instinct to build a nest rather than just its appetite.
Whatever bait you choose, use a small amount. A dab of peanut butter about the size of a pea is plenty, since rats will still investigate even a small amount, and you’re not trying to feed them a full meal before the trap does its job.
Timing Makes a Real Difference
Rats are nocturnal, which means they’re most active between dusk and dawn. You’re unlikely to see much rat activity during daylight hours, even in a home with a real infestation.
This matters for trapping because it tells you when to check and reset your traps. Checking first thing in the morning, before you leave for work or start your day, is usually your best window to see results from overnight activity.

It also means you shouldn’t panic if a trap sits untouched during the day. That’s completely normal. The real test is what’s happened by morning after a full night has passed.
If a full week goes by with zero activity at all, even during pre-baiting, it’s worth reconsidering your trap placement rather than just waiting longer in the same spot.
Avoid These Common Trapping Mistakes
A few small mistakes are responsible for most failed trapping attempts, and they’re easy to fix once you know what to look for.
- Touching the trap with bare hands can be a problem.
Rats are sensitive to unfamiliar smells, including human scent, so wearing gloves when setting or handling a trap helps avoid tipping them off.
- Using too much bait is another common issue.
A rat that can nibble food off the trigger without setting off the spring gets a free meal and learns nothing except that the trap isn’t dangerous.
- Placing traps in the open, away from walls, is probably the most common mistake of all.
Rats avoid open spaces by instinct, so a trap sitting in the middle of a room, even a well baited one, often goes completely untouched.
- Giving up too early is the last big one.
Since rats need time to get comfortable with new objects, a trap that hasn’t caught anything after two days isn’t necessarily a failure, it might just still be in the neophobia phase.
What to Do Once You’ve Caught a Rat
Once a trap has caught a rat, check it as soon as you reasonably can. This lets you reset it for further catches, and it’s just basic consideration for the animal.
Wear gloves when handling a trap with a rat in it. Rats can carry bacteria like salmonella, and direct contact isn’t something you want even with an animal that’s no longer alive.
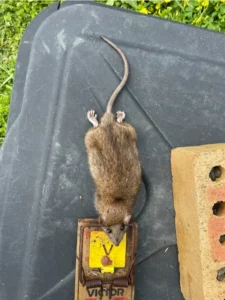
Double bag the rat and trap if it’s disposable, or carefully remove the rat if you’re reusing the trap. Seal it in a bag before placing it in an outdoor trash bin, then wash your hands thoroughly afterward, even though you wore gloves.
If you’re using a live trap, release the rat at least a mile or two away from your home, ideally somewhere it won’t simply make its way to someone else’s house instead.
Some areas have specific regulations about relocating wildlife, so it’s worth checking your local rules if this matters to you.
Comparing Trap Types Side by Side
Since the right trap really depends on your specific situation, it helps to see how the main options stack up against each other directly.
| Trap Type | Cost | Ease of Use | Best For |
|---|---|---|---|
| Snap traps | Low | Easy, reusable | Most indoor infestations |
| Electronic traps | Higher | Easy, clean reset | Homeowners who want less direct handling |
| Live traps | Moderate | Requires relocation | People who don’t want to kill rats |
| Glue traps | Low | Simple but messy | Generally not recommended by professionals |
Looking at this side by side, snap traps tend to offer the best mix of cost, reliability, and simplicity for a typical home.
Electronic traps are a solid upgrade if the extra cost isn’t a concern for you, especially if you’d rather not deal with a trap by hand at all.
Combining Trapping With Prevention
Trapping deals with the rats that are already inside, but it doesn’t stop new ones from showing up.
Pairing your trapping efforts with some basic prevention makes the whole process far more effective.
Rats can squeeze through gaps as small as half an inch, roughly the width of your thumb, so walk the outside of your home and seal any cracks or holes you find with steel wool and caulk.
This cuts off the path new rats would use to replace the ones you’ve trapped.
Storing food (including pet food) in sealed containers and cleaning up crumbs or spills quickly also removes the reason rats were drawn to the area in the first place.
A home with nothing to eat is a lot less appealing than one with an easy meal waiting.
Combining trapping, exclusion, and better food storage tends to solve a rat problem faster and more permanently than relying on traps by themselves.
When Trapping Isn’t Enough on Its Own
Trapping works well for a handful of rats, but a serious infestation is a different situation entirely. A single female rat can produce up to 6 litters a year, with as many as a dozen babies per litter.
A small problem can grow fast if it isn’t addressed.

If you’re catching multiple rats a week with no signs of slowing down, seeing rats during the day, or hearing activity in multiple parts of your home, that’s usually a sign the population has outgrown what home trapping can realistically manage.
A licensed pest control professional has access to tools and monitoring methods most homeowners don’t.
They can usually spot entry points that are easy to miss on your own. There’s no shame in calling one in once a problem outgrows what a few traps can handle.
Conclusion
Trapping rats simply comes down to understanding how they actually behave, not fighting against it. Rats are cautious by nature, so giving them time to get used to an unset trap before you actually arm it makes a bigger difference than almost anything else you can do.
Beyond that, the basics matter more than people expect. Place traps against walls near real signs of activity, use a small amount of a high value bait like peanut butter, and check your traps in the morning after a full night has passed.
Snap traps remain the simplest, most reliable choice for most homeowners, especially when they’re placed with a little patience instead of set and forgotten.
Combine your trapping with some basic exclusion work, and you’ll not only catch the rats that are already there, you’ll make it a lot harder for new ones to move in behind them.

Hi, my name is Ezra Mushala, i have been interested animals all my life. I am the main author and editor here at snakeinformer.com.