
Store-bought glue traps can be expensive, especially if you have a serious rat problem and need to use multiple traps. This leads many people to wonder if they can make their own version at home using common household materials.
After all, how hard can it be to create something sticky enough to trap a rat? So how do you make a rat glue trap yourself?
Making an effective DIY rat glue trap is extremely difficult and not recommended. While you can create sticky surfaces using materials like tree sap, corn syrup mixtures, or adhesive tape, these homemade versions won’t be sticky enough to reliably hold a rat and are messy, ineffective, and potentially inhumane.
The truth is that commercial glue traps use specially formulated adhesives that are designed specifically for this purpose.
Trying to recreate that at home with kitchen ingredients or craft supplies almost never works well enough to actually catch a rat, and you’ll likely end up frustrated and covered in sticky mess.
Why DIY Glue Traps Are Hard to Make
The adhesive used in commercial rat glue traps is a specialized product that took years of research to develop. It needs to have very specific properties that are hard to replicate at home.
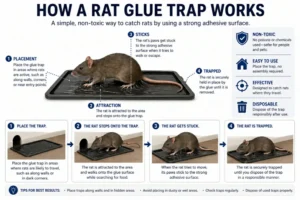
The glue has to be incredibly sticky right away. It can’t take time to dry or harden because a rat will just walk away before it sets. This means you need a pressure-sensitive adhesive that grabs on contact.
It also needs to stay sticky for weeks or even months. Most household glues and sticky substances will dry out, collect dust, or lose their tackiness after a few days. Commercial trap glue is formulated to maintain its stickiness for a long time.
The adhesive must be strong enough to hold a struggling rat. Rats are surprisingly strong and will fight hard to escape. A substance that feels sticky to your fingers might not be strong enough to hold an animal that’s pulling with all its might.
It needs to work in different temperatures and humidity levels. A trap that works in your kitchen might not work in a cold garage or a damp basement.
Commercial glues are designed to function in various environments.
The glue should be non-toxic because pets and children might touch it. This rules out many industrial adhesives that would otherwise be sticky enough to work.
Materials People Try (And Why They Don’t Work Well)
Despite the challenges, people have tried making DIY glue traps using all kinds of materials. Here are the most common attempts and their problems.
Duct tape or packing tape seems like an obvious choice since it’s very sticky. Some people try laying strips of tape sticky-side-up on a piece of cardboard.
The problem is that the adhesive on tape isn’t strong enough to hold a rat’s full weight when it’s struggling. The rat can usually pull free.

Honey and corn syrup mixtures can be very sticky and gooey. People try boiling these together to make a thick, tacky substance. But this type of stickiness is different from adhesive stickiness.
It’s more like getting your hands dirty than actually being glued to something. Rats can usually just pull their feet out.
Tree sap or pine resin is naturally sticky and was actually used in old-fashioned traps centuries ago. If you heat it up, it becomes more liquid and sticky.
The issue is that it hardens as it cools, and by the time you set the trap, it might not be sticky enough anymore. It’s also incredibly messy to work with.
Wood glue or craft glue seems promising because it’s designed to stick things together. But these glues need time to dry and create a bond.
They don’t grab on contact the way rat trap glue does. A rat can walk through wet glue before it dries.
Double-sided carpet tape is stickier than regular tape. Some people use this as a base for DIY traps.
It works better than regular tape but still usually isn’t strong enough to hold a determined rat for long.
Petroleum jelly mixed with flour or sugar creates a sticky paste. This might slow a rat down slightly, but it won’t trap one. The rat will just get messy feet and walk away.
The Most Common DIY Glue Trap Method
If you’re determined to try making your own trap despite the challenges, here’s the method most people attempt. Keep in mind this is still not as effective as commercial traps.
You’ll need a sturdy piece of cardboard (about 12 inches by 12 inches), several rolls of heavy-duty packing tape or double-sided carpet tape, scissors, and some bait like peanut butter.
Cut strips of tape long enough to cover most of the cardboard surface. If you’re using single-sided tape, you’ll place it sticky-side-up.
If you’re using double-sided tape, remove the backing to expose the sticky surface.
Lay the tape strips across the cardboard in rows. Make sure they cover most of the surface, leaving only small gaps.
The edges should be secured to the cardboard so the tape doesn’t curl up.
If using single-sided tape, you might need to tape down the ends to the bottom of the cardboard to keep everything flat. This is tricky because you’ll get sticky adhesive on your fingers.
Place a small amount of bait (like peanut butter) in the very center of the trap. This attracts the rat to walk onto the sticky surface.
Put the trap along a wall where you’ve seen rat activity. Rats tend to travel along edges, so placing it in their path increases your chances.
Check the trap frequently because even if you do catch a rat, the tape might not hold it for long. You’ll want to dispose of it before it escapes.
Why Tree Sap Traps Are Difficult
Some people try to make old-fashioned style traps using tree sap or pine resin. This method is more traditional but also more complicated.
You need to collect fresh sap from pine trees. This means finding trees that are oozing sap and scraping it off into a container. You’ll need quite a bit of it, which takes time.
Heat the sap gently to make it more liquid and sticky. You can do this in a pot on low heat, but be very careful because sap is flammable.
The smell will also be very strong and unpleasant in your kitchen.
While the sap is warm and liquid, spread it on a board or piece of heavy cardboard. Work quickly because it starts to harden as it cools.
Wear gloves because this stuff is incredibly messy.
Place bait in the center while the sap is still tacky. You have a narrow window of time when the sap is at the right consistency to work as a trap.
The biggest problem is that pine sap hardens into a solid as it cools completely. If a rat doesn’t step on it while it’s at the perfect stickiness level, the trap won’t work. The timing is nearly impossible to get right.
Also, removing pine sap from anything (including a trapped rat) is extremely difficult.
It doesn’t dissolve easily, and you’ll probably end up with sap all over your hands, floors, and anything else nearby.
The Honey and Corn Syrup Method
This is another common DIY attempt that sounds good in theory but usually fails in practice.
Mix equal parts honey and corn syrup in a pot. Some recipes add sugar to make it even stickier. Heat this mixture on the stove, stirring constantly.
Bring it to a boil and let it cook for several minutes. The idea is to reduce the water content and make it thicker and tackier. It’ll start to turn slightly brown.

Pour the hot mixture onto a piece of cardboard or a wooden board. Spread it out to cover most of the surface, but be careful because it’s extremely hot and can cause severe burns.
Let it cool slightly until it’s no longer hot but still very sticky. This is your window to set the trap. Place some additional bait in the center if you want.
The problem is that this mixture doesn’t create a true adhesive bond. It’s sticky in the sense that it’s gooey and will get on the rat’s feet, but the rat can usually still pull away. It’s more like stepping in mud than stepping on glue.
Also, this mixture will attract ants and other insects. You might end up with more bugs than rats on your trap. The sugar content makes it a magnet for every insect in your house.
Using Commercial Adhesives
Some people try to use store-bought adhesives designed for other purposes. While this works slightly better than kitchen ingredients, it still has major drawbacks.
Spray adhesives (the kind used for crafts) can coat a surface with sticky glue. You spray it on cardboard and let it get tacky. But these are designed to stick paper to paper, not to trap animals. They’re not strong enough.
Construction adhesive (like Liquid Nails) is very strong, but it needs time to cure.
You can’t use it for a trap because it won’t grab a rat on contact. By the time it’s sticky enough to hold anything, it’s already dried.
Rubber cement remains tacky for a while after application. Some people have tried using this for traps. The issue is that it forms a weak bond that’s easy to break. A rat can pull free without much effort.
Contact cement is designed to stick two surfaces together on contact. This sounds perfect, but it requires applying the cement to both surfaces and waiting for it to dry before pressing them together. That doesn’t work for trapping a moving animal.
Mouse trap glue is actually sold in some stores as a refill product. If you can find this, it’s basically just commercial trap glue in a different package.
This is probably your best option if you’re trying to make your own trap, but at that point, you might as well just buy a complete trap.
Safety Issues With DIY Traps
Making your own glue traps creates several safety hazards that you need to be aware of before you try.
Getting homemade adhesive on your skin can be difficult to remove. Unlike commercial trap glue (which is formulated to be non-toxic), some DIY mixtures might contain ingredients that irritate your skin or cause allergic reactions.
Hot sugar mixtures can cause severe burns. If you’re boiling honey or corn syrup, the mixture gets extremely hot. Spilling it on yourself can result in serious burns that are much worse than just hot water.
Children and pets are at risk if they touch your homemade trap. At least commercial traps are tested to be non-toxic. Your homemade version might contain who-knows-what that could make them sick.
Inhumane trapping is more likely with DIY traps. If your trap isn’t sticky enough to hold the rat securely, the animal might partially escape and drag the trap around while still stuck. This causes unnecessary suffering.
Fire hazards exist when heating sap or resin. These materials can catch fire if heated too much or if they come into contact with an open flame.
Your kitchen stove isn’t the safest place to be melting tree sap.
Mess and cleanup are almost guaranteed. Homemade sticky substances are nearly impossible to clean up if you spill them. You might end up with permanent sticky spots on your floor or counters.
Why Commercial Traps Are Worth the Money
After considering all the effort and problems involved in making DIY glue traps, it becomes clear why buying commercial ones makes more sense.
Commercial traps are very cheap. You can usually get a multi-pack for just a few dollars. When you factor in the cost of materials, time, and effort to make your own, buying them is actually more economical.
They work much better than homemade versions. The adhesive is specifically formulated to trap rats effectively. You won’t waste time setting traps that don’t work.
They’re safer to use because the glue is tested and certified as non-toxic. You don’t have to worry about unknown ingredients harming your family or pets.
They’re cleaner and easier to set up. Just take them out of the package, place them where you want them, and you’re done. No melting, mixing, or spreading required.
They last longer without losing stickiness. A commercial trap can sit out for weeks and still work. Your homemade version will probably dry out or collect so much dust that it stops working after a few days.
Disposal is straightforward with commercial traps. They’re designed to be thrown away with the trapped rat still on them. DIY traps might fall apart or make a bigger mess when you try to dispose of them.
Better DIY Alternatives to Glue Traps
If you’re interested in DIY pest control because you like making things yourself or want to save money, there are better options than trying to make glue traps.
DIY snap traps are much easier to build. You can make a simple wooden snap trap with basic woodworking skills. There are plans available online, and these actually work well when built correctly.
Bucket traps are very effective and easy to make. You need a 5-gallon bucket, a wire, a can, and some bait.
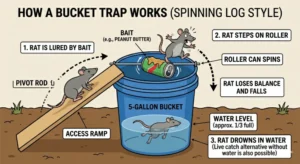
The rat walks on a spinning can to reach the bait and falls into the bucket below. This is a live-catch method that actually works.
Bottle traps can catch mice and small rats. Cut the top off a plastic bottle, invert it, and put it back in the bottle to create a funnel entrance. Add bait inside. The rat can get in but has trouble getting out.
Electric traps can be built if you have electronics knowledge, but this is more advanced. You need to create a circuit that delivers a shock when the rat completes it by stepping on contacts.
Natural repellents are the safest DIY option. Peppermint oil, mothballs, or ultrasonic devices might help keep rats away without trapping them at all.
These won’t solve a serious infestation but can help with prevention.
When to Call a Professional Instead
Sometimes the DIY approach just isn’t the right choice, especially when dealing with rats. Here are signs you should call a pest control professional.
If you have a serious infestation with multiple rats, DIY methods probably won’t be enough. Professionals have access to better tools and more effective methods than you can use at home.
When rats are in hard-to-reach places like inside walls or in your attic, you’ll have trouble setting any kind of trap effectively. Professionals have the equipment to access these areas.
If you’ve tried DIY traps (whether homemade or store-bought) for several weeks without success, it’s time to get help. You’re wasting time and money while the rat problem gets worse.
When you have health concerns or a weakened immune system, you shouldn’t be handling traps or dealing with rat droppings yourself. The risk of disease transmission is real.
If the thought of dealing with a trapped rat makes you very uncomfortable, there’s no shame in hiring someone else to handle it. Pest control is literally their job.
Conclusion
Making a DIY rat glue trap is technically possible, but it’s not practical or effective. While you can create sticky surfaces using materials like tape, tree sap, or sugar mixtures, these homemade versions won’t be sticky enough to reliably trap and hold a rat.
The adhesive in commercial glue traps is specially formulated to work on contact, maintain its stickiness for weeks, and hold a struggling rat in place.
The time, effort, and materials required to make a homemade glue trap that might not even work make it more sensible to just buy commercial traps, which are very inexpensive.
If you’re interested in DIY pest control, you’re better off making bucket traps, snap traps, or other types of mechanical traps that don’t rely on adhesive.
If you do try to make your own glue trap despite these warnings, be very careful about safety. Hot sugar mixtures can burn you, sticky messes are hard to clean up, and homemade adhesives might not be safe for pets and children.
And remember that an ineffective trap is also an inhumane trap because it might partially catch a rat without holding it securely, causing unnecessary suffering.
Hi, my name is Ezra Mushala, i have been interested animals all my life. I am the main author and editor here at snakeinformer.com.