

Rats living in your yard are a different challenge than rats living in your house. Rain, competing food sources, and animals like raccoons and squirrels all get in the way of a trap that would work perfectly indoors. So what homemade rat traps actually work outside?
A few homemade rat traps that work well outdoors are the covered bucket and ramp trap, the PVC pipe seesaw trap, the milk jug bait station, the wooden board box trap, the burrow entrance drop trap, the weighted bowl trap, the sunken bucket pitfall trap, the shed corner trap station, and a properly housed snap trap. Each one needs a bit more protection from weather and wildlife than an indoor trap does.
That protection piece is what really separates outdoor trapping from indoor trapping, and it changes how you should build and place almost everything on this list.
Why Outdoor Rat Trapping Works Differently Than Indoor Trapping
Rats outside have a lot more going for them than rats stuck inside your walls.
A yard usually offers more food than any trap can compete with. Garbage, bird seed, pet food left outside, fallen fruit, and compost all give a rat plenty of reasons to ignore your bait.
Weather is the other big factor. Rain can wash bait away, swell wood, and rust metal parts, so a trap that works great in a dry garage often falls apart outside within a week.

Non-target animals are a real concern too. Raccoons, squirrels, birds, and neighborhood cats can all trigger an open trap or steal the bait before a rat ever finds it.
This is why almost every trap on this list gets built with some kind of cover or housing around it. An enclosed trap protects the bait from rain, keeps raccoons and birds from stealing it, and still lets a rat walk right in.
Rats outdoors also tend to stick even closer to structure than indoor rats do. Fence lines, foundation edges, woodpiles, and the base of sheds are where you’ll have the most luck.
Since rats are naturally cautious of anything new, expect outdoor traps to take a few days to start working, especially if you skip pre-baiting them first.
The Covered Bucket And Ramp Trap Holds Up Against Weather
This is the same bucket and ramp design that works indoors, but built with weather protection added on.
You’ll need a 5-gallon bucket with a lid, a thick wooden dowel or metal rod, a large empty can, and a solid ramp. You’ll also want something to shield the setup from rain, like a scrap piece of plywood or an old plastic tote turned on its side.
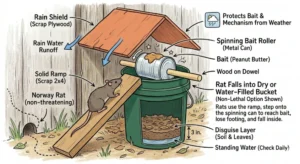
Set up the can and rod exactly like the indoor version, spinning freely across the top of the bucket. Bait it with peanut butter or bacon grease.
Prop your rain shield over the top of the whole setup. Angle it so water runs off to the side instead of soaking the bucket or the bait.
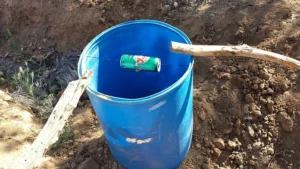
Place the bucket tight against a wall, fence, or foundation. Open yard space rarely gets much rat traffic.
Check this trap daily if possible, since standing water from rain can build up inside an uncovered bucket even with a shield overhead.
The PVC Pipe Seesaw Trap Is Built Specifically For Outdoor Use
This design works well outside because the narrow pipe naturally keeps out most animals bigger than a rat.
You’ll need a length of PVC pipe about four inches wide and two to three feet long, a fulcrum (a brick or block of wood works fine), a bucket, and some bait.
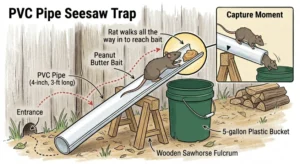
Balance the pipe across the fulcrum like a seesaw, with one end hanging out over the open bucket below.
Place bait at the far end of the pipe, the end hanging over the bucket, so a rat has to walk all the way out to reach it.
As the rat’s weight shifts past the balance point, that end of the pipe drops down and slides the rat into the bucket.
The narrow opening of the pipe also means most non-target animals, other than maybe a very determined squirrel, won’t be able to squeeze in and set it off.
The Milk Jug Bait Station Is Cheap, Weatherproof, And Easy To Replace
This is one of the simplest ways to keep bait dry and protected without spending money on materials.
Grab an empty plastic milk jug or a similar sized jug with a screw on cap, scissors or a utility knife, and your bait or trap of choice.
Cut a rat sized entry hole into one side of the jug, low enough that a rat can climb in without much effort.
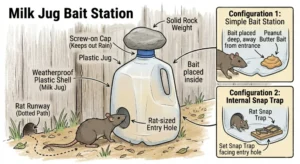
If you’re using this as a bait station rather than a kill trap, place the bait or a small glue board deep inside the jug, away from the entrance.
If you’d rather use it to house a small snap trap, set the trap inside the jug facing the entrance hole, baited and armed.
Weigh the jug down with a rock or brick placed on top, or stake it to the ground, so wind and animals can’t tip it over.
The solid plastic shell keeps rain off the bait and makes the whole thing easy to spot, check, and replace if it gets damaged.
The Wooden Board Box Trap Handles Bigger Rat Populations
If you’re dealing with more than a rat or two, this design gives you something sturdier that can be reused many times over.
You’ll need several pieces of one by six or one by eight inch wood, screws or wood glue, a hinge, and a way to build a simple trigger mechanism, like a notched stick or a spring.
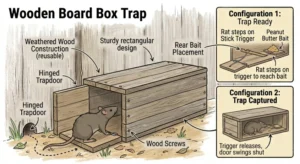
Build a rectangular box just large enough for a rat to enter fully. Add a hinged door on one end, connected to a trigger inside.
Set bait at the back of the box, positioned so a rat has to step on or disturb the trigger to reach it.
When the trigger releases, the hinged door swings shut and seals the rat inside.
This design takes more time to build than most others on this list. But a well built wooden box holds up to years of outdoor weather far better than plastic or cardboard versions.
The Burrow Entrance Drop Trap Targets Rats Right At The Source
If you’ve found an active rat burrow in your yard, this approach lets you set a trap right where the rats already come and go.
You’ll need a small bucket or deep container that fits over or beside the burrow entrance, plus a bit of soil or sod to help disguise it.
Dig a small hole just outside the burrow entrance, sized to fit your bucket. Sink the bucket into the ground so its rim sits level with the surrounding soil.
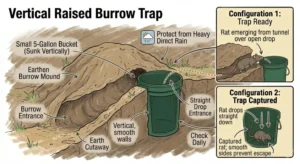
Cover the top loosely with a thin layer of grass, leaves, or soil, similar to a basic pitfall setup. It just needs to blend into the ground around the burrow.
A rat leaving or returning to the burrow can fall through the covering and get stuck inside the bucket. The smooth sides make it hard to climb back out.
This method works best on burrows you’re confident are still active. Digging around an old, abandoned burrow wastes your time and effort.
The Weighted Bowl Trap Works Well Near Woodpiles And Sheds
This trap is a scaled up version of the indoor bowl and stick trap, built sturdy enough to survive being outside.
You’ll need a heavy ceramic or ceramic coated metal bowl, a wooden stick or dowel, and bait like peanut butter or a piece of bacon.
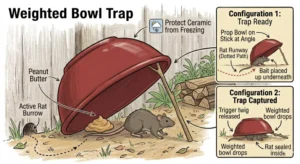
Prop the bowl on the stick at an angle, the same way you would indoors. Place the bait up underneath where a rat has to reach for it.
Set this trap in a covered, low traffic area like under a shed, deck, or woodpile. Exposed placement makes it easy for wind or curious animals to knock the setup out of position.
Ceramic can crack in freezing temperatures if it gets wet and then frozen, so bring this trap in or store it somewhere dry once cold weather sets in.
The Sunken Bucket Pitfall Trap Requires No Bait At All
This is one of the few traps on this list that can work without any bait. That makes it a good option if rats in your yard seem to be ignoring food based traps.
You’ll need a tall bucket, a shovel, and something to disguise the opening, like cardboard, leaves, or a thin board.
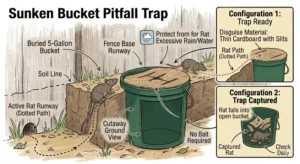
Dig a hole along a known rat path, like the base of a fence or the edge of a foundation. It needs to be deep enough that the bucket sits flush with the ground once buried.
Cover the opening loosely with your disguise material. Cut a slit or weak spot in the center so a rat’s weight breaks through as it walks over.
Rats travel the same paths over and over, so a well placed pitfall trap along an active runway can catch one with nothing more than gravity and a bit of patience.
Check this trap daily, since it offers no shelter or comfort for anything that falls in.
The Shed Corner Trap Station Combines Shelter With A Trap
Sheds, garages, and other outbuildings are common rat hideouts, and building a small station in a corner gives you a low effort way to keep tabs on activity there.
You’ll need a piece of scrap wood or a small box to act as a shelter, a snap trap or glue trap, and bait.
Set the trap inside your makeshift shelter, tucked into a corner where you’ve noticed droppings or gnaw marks.
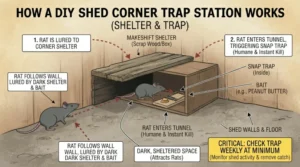
The shelter keeps the trap out of sight and out of the way. It still leaves the trap accessible to any rat exploring that corner of the shed.
This setup works especially well because rats are drawn to dark, sheltered spaces already. You’re placing the trap somewhere they already want to be.
Check stations like this weekly at minimum. Sheds and garages don’t always get walked through daily the way a kitchen does.
A Properly Housed Snap Trap Still Works Well Outdoors
A classic rat sized snap trap can absolutely work outside. It just needs to be protected the way anything else on this list needs to be.
Build or buy a simple weatherproof housing, like a length of wide PVC pipe with the trap secured inside, or a small wooden box with an entry hole cut into one end.
This keeps rain off the trigger mechanism, which can rust or jam if it’s left exposed for too long.
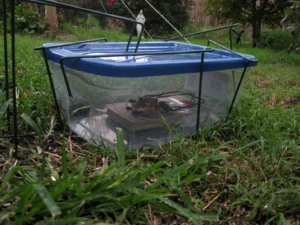
It also keeps birds, squirrels, and curious pets from setting off a trap that isn’t meant for them.
Secure the trap itself to the base of the housing with a screw or zip tie. An unsecured trap can get dragged off by a caught rat or knocked around by wind.
Set the trigger facing the entrance hole. Bait it with something protein rich that holds up well outdoors, like bacon or a small piece of jerky.
What Bait Holds Up Outdoors?
Outdoor bait needs to survive weather and compete with everything else a rat could be eating in your yard.
Bacon and bacon grease tend to outperform almost everything else outside. The strong smell carries further and holds up better in open air than something like chocolate.
Peanut butter still works, but it can dry out faster outdoors than it does in a sheltered spot indoors. Check and refresh it more often than you would inside.
Dried meat, like jerky or dehydrated dog treats, holds its scent for days without spoiling. That makes it a solid choice for traps you can’t check every single day.
Avoid overly sweet bait outdoors if you’re in an area with ants, since a swarm of ants can bury your bait before a rat ever finds it.
Placement Tips Specific To Outdoor Trapping
Rats outdoors stick to the same kinds of edges and structures they do indoors, just on a larger scale.
Fence lines, foundation walls, the base of sheds, woodpiles, and dense shrubs are the most productive spots to start.
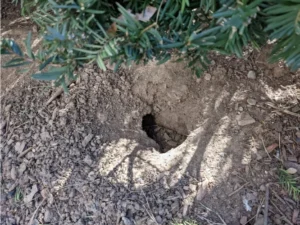
Look for burrow entrances, which are usually smooth, round holes about the size of a tennis ball, often with a worn path leading in and out.
If you’re dealing with a larger rat population, professionals often recommend one trap for roughly every fifteen feet of fence line or wall. That gives you a sense of scale for a serious yard problem.
Move traps to new spots every couple of weeks if you’re not catching anything. Rats can learn to avoid a trap that’s been sitting in the same place for too long.
Keep traps a good distance from areas where kids or pets play. Consider marking trap locations so you don’t forget where you’ve placed them.
Safety And Legal Considerations Outdoors
Outdoor trapping brings a few extra safety concerns compared to trapping indoors.
Non-target animals, including birds, squirrels, and neighborhood pets, can wander into an open trap. Covered housings aren’t just about weatherproofing, they matter for safety too.
Check local regulations before trapping or relocating rats, since some areas have rules about how far you need to release an animal or whether relocation is allowed at all.
Wear gloves when handling any trap or bait. This keeps your scent off the trap and protects you from bacteria in rat droppings or urine.
Wash your hands thoroughly after checking any outdoor trap, and avoid touching your face until you’ve done so.
If you’re using a lethal trap, dispose of the rat promptly. A rat left out in the open can attract raccoons or other scavengers to your yard.
Conclusion
Trapping rats outside takes a bit more planning than trapping them indoors. Weather, competing food, and the risk of catching the wrong animal all factor in.
The covered bucket trap, the PVC pipe seesaw trap, the milk jug bait station, the wooden board box trap, the burrow entrance drop trap, the weighted bowl trap, the sunken bucket pitfall trap, the shed corner trap station, and a properly housed snap trap all give you real, weather ready options.
Protecting your bait and trigger mechanism from rain, placing traps along fences and foundations, and checking them regularly matter just as much as the design you pick.
Stick close to structure, protect what you build from the weather, and give it a few days to start working. You’ll get real results in your yard.

Hi, my name is Ezra Mushala, i have been interested animals all my life. I am the main author and editor here at snakeinformer.com.