
Dealing with rats doesn’t always mean you need to run to the store and buy expensive traps. Sometimes you need a solution right now, or maybe you want to try a more budget-friendly approach first. What kinds of rat traps can you actually make at home?
You can make effective rat traps at home using common household items like buckets, bottles, cans, and cardboard. The most popular homemade designs include the bucket trap, bottle trap, and ramp trap. These work by trapping rats alive or using gravity to catch them.
These DIY traps won’t cost you much money and can be just as effective as store-bought options if you build them correctly. Plus, making your own traps means you can customize them to fit your specific situation.
The Classic Bucket Trap
The bucket trap is probably the most popular homemade rat trap because it’s simple, cheap, and actually works really well. You can catch multiple rats with one trap, which makes it efficient.
Here’s what you need: a 5-gallon bucket, a wire coat hanger or metal rod, an aluminum can, peanut butter, and a ramp (a piece of wood or sturdy cardboard works fine).
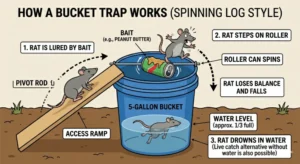
Start by punching a small hole through the top and bottom of the aluminum can, right in the center. Thread the wire or rod through these holes so the can spins freely on the wire.
Spread peanut butter all around the outside of the can. Make sure it’s covered well because this is what will attract the rats.
Set the wire across the top of the bucket, resting each end on opposite sides of the bucket’s rim. The can should hang in the middle, able to spin freely.
Place the ramp leading up to the edge of the bucket. Rats will smell the peanut butter, climb the ramp, and try to walk across the wire to reach the can.
When a rat steps onto the spinning can to get the peanut butter, the can rotates and dumps the rat into the bucket below. The rat can’t climb back out of the smooth-sided bucket, so it’s trapped.
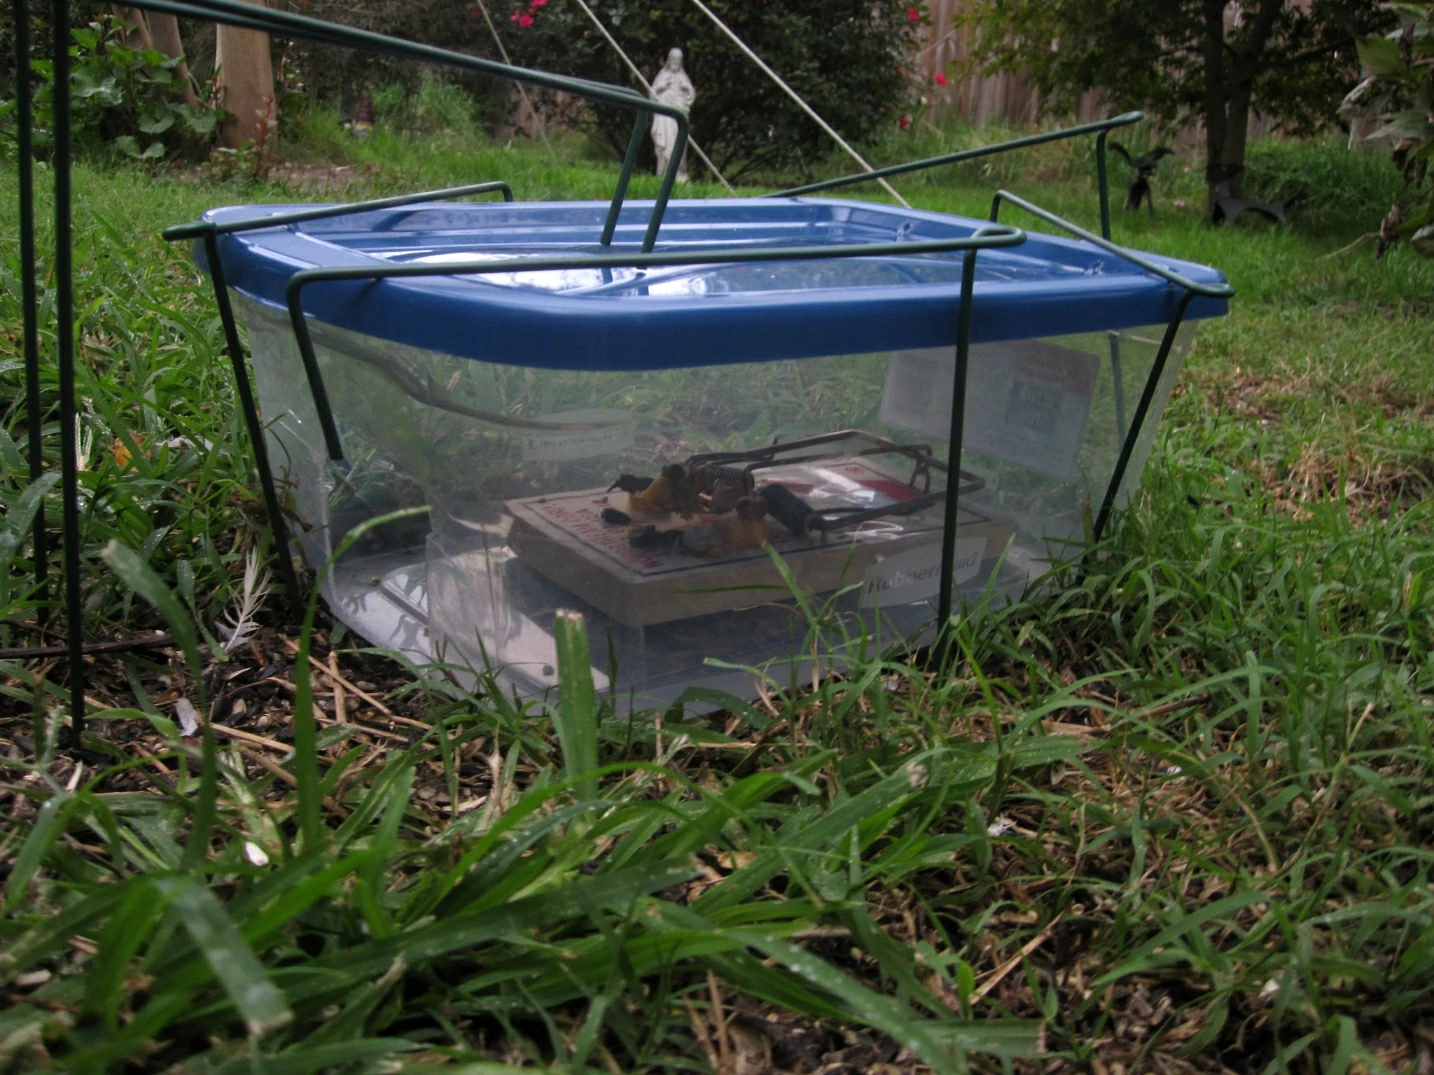
You can add a few inches of water to the bucket if you want this to be a lethal trap. Without water, it’s a live trap, and you’ll need to check it often and release the rats far from your home.
The Bottle Trap Method
The bottle trap is another easy homemade option that works surprisingly well for catching rats. It’s especially good if you’re short on space or want something more portable.
You’ll need a large plastic bottle (like a 2-liter soda bottle), scissors or a knife, bait, and something to secure the trap.
Cut the bottle about one-third of the way down from the top. You’ll have two pieces: the bottom part (which is larger) and the top part with the narrow opening.
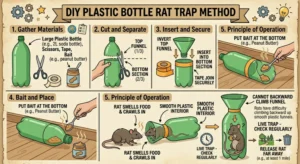
Turn the top part upside down and insert it into the bottom part, creating a funnel. The narrow opening should point into the larger section. Tape the two pieces together so they don’t come apart.
Put bait (peanut butter works great) at the bottom of the bottle trap. The rat will smell it and crawl through the funnel to get to the food.
Once the rat is inside the larger section eating the bait, it can’t figure out how to get back out through the funnel. Rats aren’t great at climbing backwards up smooth plastic surfaces.
This creates a live trap, so you’ll need to check it regularly. When you catch a rat, you can release it far from your home (at least a mile away) or dispose of it however you see fit.
How to Build a Ramp Trap
The ramp trap is basically a trapdoor system that works on the principle of balance. It’s a bit more complicated than the bucket trap but can be very effective.
You need a flat piece of wood or thick cardboard (about 12 inches long), a table or counter edge, tape, and bait. This trap works best in elevated locations.
Balance the board on the edge of a table or counter so that about half extends over the edge. The board should be able to tip when weight is added to the extended end.
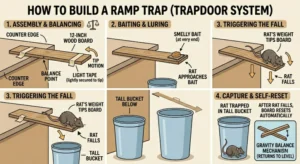
Secure the board lightly with tape on the table side so it stays balanced but can still tip when a rat walks on it. Don’t tape it too firmly or it won’t work.
Put your bait at the very end of the board that’s hanging over the edge. When a rat walks out onto the board to get the bait, its weight tips the board and the rat falls.
Place a tall bucket or trash can on the floor directly below the trap. The rat falls into the container and can’t escape.
This trap resets itself automatically. After the rat falls, the board tips back to its balanced position and is ready to catch another rat.
The Box Trap Design
A box trap is one of the oldest designs for catching small animals, and it works just fine for rats. You can make one with materials you probably already have around your house.
You need a cardboard box (or a wooden crate if you have one), a stick or dowel, some string, and bait. The box should be big enough for a rat to walk into comfortably.
Prop up one end of the box with the stick, creating a lean-to shelter. The stick should be positioned so that it’s holding up the box at about a 45-degree angle.
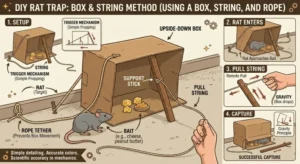
Tie the string to the stick. Run the string to where you’ll be waiting and watching, or you can create a trigger system with the bait.
Put the bait inside the box, positioned so the rat has to go all the way in to reach it. When the rat goes for the bait, you pull the string (if you’re waiting), or the rat bumps the trigger and knocks out the stick.
The box drops, trapping the rat inside. You’ll need to be quick with this one if you’re pulling the string manually, so it works best with a trigger system.
To make a trigger, attach the bait to the string so that when the rat tugs on the bait, it pulls the string and knocks down the stick. This requires some practice to get the balance right.
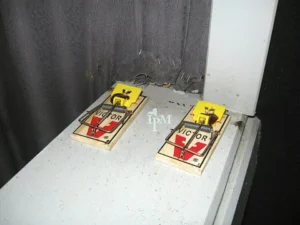
Can You Make a Snap Trap at Home?
Making a snap trap that works like the classic Victor-style traps is difficult and potentially dangerous. These traps rely on strong springs and precise trigger mechanisms that are hard to replicate safely at home.
If you try to make a spring-loaded trap without proper knowledge, you could end up hurting yourself. The springs need to be strong enough to kill a rat quickly, which means they’re also strong enough to break your fingers.
It’s generally not worth the risk or effort to try to build a snap trap from scratch. These traps are so cheap to buy (usually just a few dollars) that making your own doesn’t save enough money to justify the hassle.
If you want the instant kill approach of a snap trap but don’t want to buy one, you’re better off focusing on other lethal trap designs like the bucket trap with water.
Stick to trap designs that use gravity and simple mechanics rather than spring-loaded mechanisms. They’re safer to build and just as effective when made correctly.
The Can and Cardboard Trap
This is another simple design that uses materials you probably have in your recycling bin. It’s lightweight, easy to set up, and catches rats humanely.
You need a large can (like a coffee can), a flat piece of sturdy cardboard, bait, and a ramp or way for the rat to reach the trap.
Cut the cardboard so it covers the top of the can with an extra inch or two hanging over on all sides. The cardboard should rest on the rim of the can but not be attached.
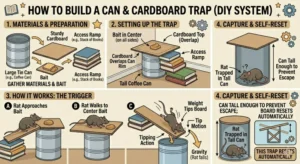
Place bait in the center of the cardboard. Make sure it’s positioned so the rat will walk to the middle to get it.
Set the can on the floor near a wall where rats travel. Put a small ramp or stack of books next to it so rats can climb up to the level of the can opening.
When a rat climbs onto the cardboard to reach the bait, its weight causes the cardboard to tip and the rat falls into the can. The cardboard falls back into place, ready for another rat.
The can needs to be tall enough that the rat can’t jump back out. Coffee cans usually work well, but you might need something taller for larger rats.
Using Glue Boards You Make Yourself
You can technically make your own glue trap, but it’s messy and honestly not worth the effort when commercial glue traps are cheap and readily available.
If you really want to try it, you’d need an extremely sticky substance and a flat board. Some people use pine tar or other natural sticky substances, but getting the right consistency is tricky.
The bigger issue with homemade glue traps is that they’re often not sticky enough to hold a rat, or they’re so sticky that they’re dangerous to handle and difficult to dispose of.
Commercial glue traps are formulated with specific adhesives that stay sticky under different temperatures and conditions. It’s hard to replicate this at home without special materials.
If you want to use a glue trap approach, it’s better to just buy them. Save your DIY efforts for the mechanical traps that are actually easier and safer to make at home.
How Effective Are Homemade Traps?
Homemade rat traps can be just as effective as store-bought traps if you build them correctly and place them in the right locations. The key is understanding what makes a trap work.
The bucket trap is particularly effective because it can catch multiple rats and doesn’t require constant resetting. Many people report catching several rats in one night with a well-placed bucket trap.

Bottle traps and box traps work well for single catches. They’re good options when you only have a few rats or when you’re trapping in multiple locations and need several traps.
The success of any trap depends more on placement, bait, and patience than on whether it’s homemade or store-bought. A well-built homemade trap in the right spot will catch rats. An expensive trap in the wrong spot won’t.
One advantage of homemade traps is that you can make them larger or customize them for your specific situation. If you have particularly large rats or an unusual space where you need to trap, you can adjust your design accordingly.
What Bait Works Best in Homemade Traps?
The bait you use is just as important as the trap design itself. Rats are attracted to food with strong smells, and some baits work much better than others.
Peanut butter is the gold standard for rat bait. It smells strong, rats love it, and it’s sticky so they have to work to get it off, which increases the chances of triggering the trap.
Chocolate is another excellent choice. Rats have a sweet tooth, and chocolate’s strong smell attracts them from a distance. Use chocolate syrup or Nutella for best results.
Bacon or bacon grease works really well because of the strong, fatty smell. You can even save bacon grease and spread it on traps as bait.
Nuts (especially peanuts and almonds) are natural rat foods and work well as bait. You can use nut butters or whole nuts depending on your trap design.
Dried fruit like raisins or dried apricots can attract rats, though they’re not quite as effective as the other options. They work better in combination with something else.
Whatever bait you use, make sure it’s fresh. Old, dried-out bait doesn’t smell as strong and won’t attract rats as effectively.
Where to Place Your Homemade Traps
Trap placement is critical for success. You can build the best trap in the world, but if you put it in the wrong place, you won’t catch any rats.
Rats travel along walls and edges, almost never crossing open spaces. Place your traps against walls where you see rat droppings, gnaw marks, or greasy rub marks.
Look for rat runways (the paths rats use repeatedly). These show up as slightly worn or dirty trails along walls or in insulation. Putting traps on these runways significantly increases your catch rate.
Rats prefer dark, quiet areas. Traps in closets, under sinks, in basements, or in attics will perform better than traps in busy, well-lit areas.
Check areas where you see rat signs like droppings, chewed food packages, or holes gnawed in walls. These are clear indicators that rats are active in that location.
Don’t place traps near strong-smelling items like cleaning products or air fresheners. These smells can mask the scent of your bait and make the trap less attractive to rats.
If you’re not catching rats after a few days, move your traps to different locations. Sometimes you need to experiment to find the exact spots where rats are traveling.
Safety Concerns with Homemade Traps
When you’re making and using homemade rat traps, there are some safety issues to keep in mind.
Always wear gloves when handling rats or traps that have caught rats. Rats carry diseases that can be transmitted through contact with their urine, droppings, or saliva.
If you’re using a bucket trap with water (making it lethal), check it every day. You don’t want dead rats decomposing in a bucket in your home. The smell is terrible and it’s a health hazard.
Make sure your traps are stable and won’t tip over easily. A trap that falls apart can release a rat or create a mess that’s difficult to clean up.
If you have pets or small children, place your traps where they can’t reach them. Even non-lethal traps can scare or harm pets if they get caught in them.
When disposing of caught rats, seal them in a plastic bag before putting them in the trash. This prevents odors and stops other animals from trying to get to them.
Clean and disinfect any area where you’ve had a rat trap. Use a bleach solution or commercial disinfectant to kill any bacteria or viruses the rat might have left behind.
How to Improve Trap Success Rate
If you’re not catching as many rats as you’d like, there are some tricks to improve your success rate.
Use multiple traps in different locations. More traps mean more chances to catch rats. Spread them around areas where you see rat activity.
Change your bait every few days. Fresh bait smells stronger and is more attractive to rats. Old, dried-out bait loses its effectiveness.
Leave traps unset for a few days with bait on them. This lets rats get comfortable with the trap and associate it with food. Then set the trap and you’ll likely catch rats immediately.
Remove competing food sources. If rats have easy access to other food in your home, they’re less likely to risk going after trap bait. Store all food in sealed containers.
Be patient. Some rats are cautious and won’t approach a trap for several days. Don’t give up if you don’t catch anything right away.
Try different trap types if one isn’t working. Some rats might avoid bucket traps but walk right into bottle traps, or vice versa.
Can You Reuse Homemade Traps?
Most homemade traps can be used multiple times, which is one of their advantages over some commercial traps.
Bucket traps can catch rats repeatedly without any modification. Just remove caught rats, add fresh bait, and the trap is ready to go again.
Bottle traps and box traps might need some cleaning between uses, especially if a rat has left droppings or urine inside. Rinse them out, disinfect them, and they’re good for another use.
Some people worry that the smell of a caught rat will warn other rats away from the trap. This can happen, but thorough cleaning usually solves the problem.
If you find that a trap stops working after catching a rat, try washing it with soap and water, letting it dry completely, and then re-baiting it. This removes scent markers that might be warning other rats.
In general, homemade traps are more reusable than disposable traps like glue boards. This makes them more economical and environmentally friendly in the long run.
Conclusion
You can definitely make effective rat traps at home using simple materials like buckets, bottles, and cardboard. The bucket trap is probably your best bet for catching multiple rats efficiently, while bottle and box traps work well for targeted trapping in specific areas.
The key to success with homemade traps is good placement, fresh bait, and patience. A well-designed homemade trap in the right location will catch rats just as well as expensive store-bought options.
These DIY solutions save money and give you the flexibility to create traps that fit your exact needs. Whether you’re dealing with a minor rat problem or a major infestation, homemade traps can be an important part of your pest control strategy.
Hi, my name is Ezra Mushala, i have been interested animals all my life. I am the main author and editor here at snakeinformer.com.