
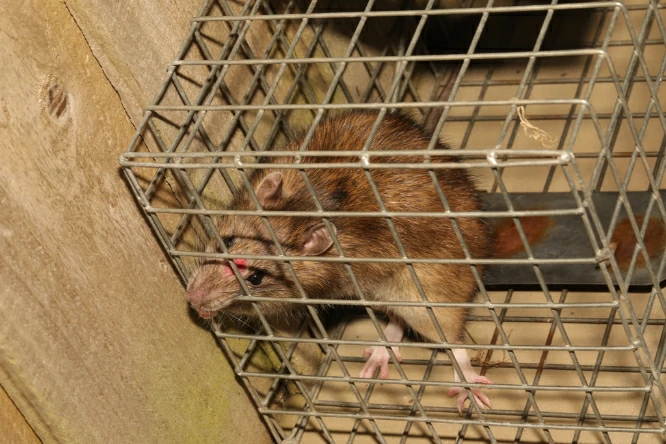
Not everyone wants to kill a rat just because it’s found its way into a garage or shed. If you’d rather catch and release, building a humane trap yourself is easier than you might think. So how do you build a DIY humane rat trap that actually works?
A few DIY humane rat traps that work well are the wire cage box trap, the walk the plank bucket trap, the auto reset flip lid trap, the PVC pipe tunnel trap, the tip and drop tube trap, the funnel entry cage trap, and the box trap with a drop door. Each one catches the rat unharmed, but a few of these need real thought given to ventilation, checking frequency, and what happens after the catch.
That last part matters more than most guides mention. Catching a rat alive is only half of doing this humanely.
What happens next affects the animal just as much as the trap itself.
What Actually Makes A Rat Trap Humane?
Before getting into specific designs, it helps to understand what separates a genuinely humane trap from one that just avoids killing the rat outright.
A trap needs enough room inside for the rat to stand and turn around comfortably. A cramped space increases stress and the risk of injury as the rat tries to move.

Ventilation matters just as much as space. Rats can overheat quickly in an enclosed container, especially in a garage, attic, or anywhere that gets warm during the day.
Smooth edges and no pinch points also matter, since a rat struggling to escape can hurt itself on a sharp corner or a poorly built trigger mechanism.
Material choice affects welfare more than people realize too. Galvanized wire mesh holds up well outdoors and lets air move freely, while solid plastic or wood traps can trap heat if you don’t add ventilation holes yourself.
Checking frequency might be the single most important factor of all. Wildlife professionals recommend checking a live catch trap every eight to twelve hours, since a trapped rat can die from heat, dehydration, or plain stress if left too long.
Temperature plays a bigger role than most people expect. A rat can suffer heat stroke surprisingly fast in an enclosed trap sitting in a warm garage, attic, or shed, even on a day that doesn’t feel especially hot to you.
There’s also an honest conversation worth having about what happens after the catch, which most guides skip entirely.
When A Humane Trap Might Not Be The Right Choice
Live trapping isn’t automatically the kindest option in every situation, even though it feels that way at first.
Cage and box traps ask a rat to fully commit to entering an enclosed space. Cautious rats often avoid that for days longer than they would a simple snap trap.
This means you may need several humane traps running at once to see real results. Setting just one or two often just pushes rats toward the untrapped areas of your home instead of catching them.
If you’re dealing with rats in a hard to reach space like an attic or crawl space, checking a live trap every eight to twelve hours may not be realistic for you.
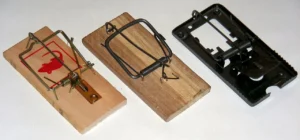
In that case, a properly placed lethal snap trap kills quickly and doesn’t require the same constant monitoring. That may actually cause less overall suffering than a live trap you can’t check often enough.
None of this is meant to talk you out of humane trapping. It’s meant to help you choose the approach that actually fits your situation, rather than the one that sounds best in theory.
The Truth About Relocating A Rat You’ve Caught
This part isn’t always comfortable to hear, but it matters if you actually care about doing this humanely.
Wildlife organizations and researchers have found that relocated rats often have very low survival rates once released somewhere unfamiliar. They struggle to find food and shelter, and existing rat populations in the new area may attack them.
This isn’t meant to discourage you from live trapping. It’s meant to make sure you go into it with clear eyes about what actually happens after the trap door closes.

If the rat you caught has dependent young back at its nest, relocating the parent can leave those babies to starve. That’s not something most people think about in the moment.
Some wildlife groups now recommend humane euthanasia over relocation in many cases, especially for rats caught indoors. The odds of survival after release are often worse than people assume.
None of this means live trapping is pointless. It just means the choice to relocate deserves the same care as the trap itself, not an afterthought once the rat is already caught.
If you do relocate, pick a spot with natural cover, food, and water, ideally on land where you have permission. Release the rat as soon as possible after transport rather than letting it sit in the trap any longer than necessary.
The Wire Cage Box Trap Is The Standard Humane Option
This is the classic design most people picture when they think of a live catch rat trap. It holds up well when built correctly.
You’ll need galvanized wire mesh, a wooden frame or a small hinged wire door, a trigger plate, and a spring or counterweight to close the door.
Build a rectangular cage large enough for a rat to move around in comfortably. It should be at least a foot long and several inches wide and tall.
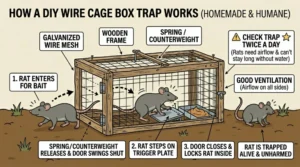
Attach a spring loaded or counterweighted door at one end, connected to a trigger plate or lever inside the cage near the bait.
When the rat steps on the trigger or pulls at the bait, the door swings shut and locks behind it.
Since the wire mesh allows airflow on all sides, this design solves the ventilation problem better than most solid walled options.
Check this trap at least twice a day, since a rat caught inside has no way to cool off or find water on its own.
The Walk The Plank Bucket Trap Works Well As A Catch And Release Option
This is the same design used in lethal bucket traps, just built without water in the bottom.
You’ll need a tall bucket, a thin board or ruler to act as the plank, a small counterweight, and bait.
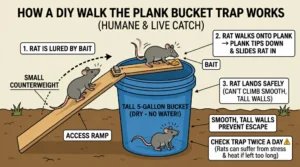
Set the plank up so it extends out over the open bucket, balanced so it tips downward once weight is added near the far end.
Place bait at the far end of the plank, past the point where it starts to tip.
As the rat walks out to reach the bait, its weight overcomes the balance point, and the plank tips down, sliding the rat into the bucket below.
Since the bucket is dry, the rat lands safely but can’t climb back out due to the smooth, tall walls.
The one thing to watch closely with this design is checking time. A rat left in a dry bucket for too long can still suffer from stress, heat, or lack of water, even without drowning being a risk.
The Auto Reset Flip Lid Trap Keeps The Fall Gentle
This design uses the same flip lid mechanism as its lethal counterpart, but built with a soft landing in mind.
You’ll need a 5-gallon bucket, a stiff piece of plastic or thin plywood cut to fit the bucket’s opening as a lid, a length of wire to act as a hinge, and bait.
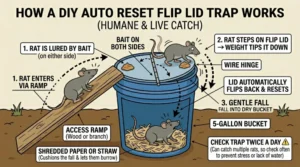
Cut the lid so it balances on the wire hinge across the center of the bucket’s rim. It should tilt slightly toward one side when nothing is on it.
Line the bottom of the bucket with a few inches of shredded paper or straw. This cushions the fall and gives the rat something to burrow into while it waits.
Bait both sides of the lid, since a rat can approach and trigger it from either direction.
When a rat steps onto the lid, its weight tips that side down and drops the rat inside. The lid then swings back to a balanced position on its own.
This trap resets automatically, which makes it especially important to check often. It can catch more than one rat before you get back to it.
The PVC Pipe Tunnel Trap Uses A Rat’s Own Instincts
Rats naturally prefer tunnels and enclosed spaces over open areas, and this design takes advantage of that instinct.
You’ll need a length of PVC pipe about four inches wide, a spring loaded trap door mechanism, and bait.
Fit one end of the pipe with a simple one way door, hinged so it swings inward but not back out.
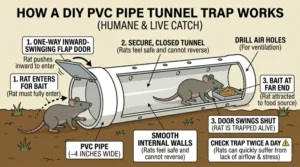
Place bait at the far end of the pipe, deep enough that the rat has to fully enter the tunnel to reach it.
Once the rat walks in and the door swings shut behind it, the smooth interior of the pipe and the one way door keep it from finding its way back out.
This trap works especially well for cautious rats, since the tunnel shape feels safer to them than an open cage or bucket.
Drill a few small air holes along the length of the pipe if you’re using a sealed design, since airflow can be limited inside a narrow tube.
The Tip And Drop Tube Trap Offers A Gentler Alternative To A Bucket
This design softens the drop that comes with most bucket style traps, which can matter for smaller or more skittish rats.
You’ll need a length of wide PVC pipe or a cardboard tube, a fulcrum, and a soft landing container like a box lined with towels.
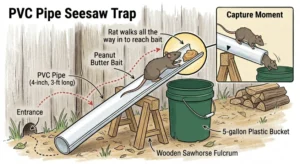
Balance the tube across a fulcrum like a seesaw, with one end positioned over your landing container.
Place bait at the far end of the tube, over the container, so the rat has to walk the full length to reach it.
As the rat’s weight shifts past the balance point, the tube tips down at a gentler angle than a straight drop. This eases the rat into the container below rather than dropping it several feet.
This is a good option if you’re specifically concerned about injury during the catch. The landing is much softer than a standard bucket trap.
The Funnel Entry Cage Trap Makes It Hard To Escape, Not Hard To Enter
This design relies on a one way funnel opening rather than a trigger mechanism. That means fewer moving parts to build or maintain.
You’ll need a cage or box with solid or mesh sides, flexible wire or stiff wire mesh to build a funnel, and bait.
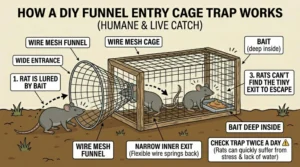
Build a cone shaped funnel out of wire mesh, wide at the outer opening and narrow at the point where it enters the cage.
Attach the narrow end of the funnel to an opening in the cage, so the wide end faces outward.
Place bait deep inside the cage, away from the funnel entrance.
A rat can push through the narrow point of the funnel to get inside. The flexible wire springs back into place behind it, which makes the return trip much harder.
This design has the advantage of catching more than one rat before you need to check it. The entrance stays usable even after the first rat gets in.
The Box Trap With A Drop Door Is Simple And Reliable
This is a straightforward design that relies on a falling door instead of a spring or complex trigger.
You’ll need a wooden or sturdy cardboard box, a stick or dowel to prop the door open, string, and bait.
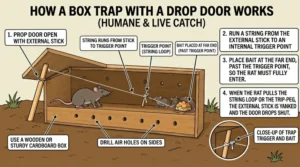
Prop one end of the box up with the stick, positioned so knocking the stick loose lets that end drop shut like a door.
Run a string from the stick to a trigger point near the bait, deep inside the box.
Place bait at the far end, past the trigger point, so the rat has to fully enter before disturbing the string.
When the rat pulls or brushes against the trigger, the stick releases and the door drops shut, sealing the rat inside.
Since this design uses a solid box rather than mesh, make sure to drill several air holes along the sides before using it.
Bait That Works Well For Humane Traps
Live catch traps ask more of a rat than lethal traps do. The rat has to fully commit to entering an enclosed space rather than just grabbing a quick bite.
Peanut butter remains a strong, reliable choice. Its smell carries well, and its texture keeps the rat engaged at the trigger point for longer.
Bacon or a bit of bacon grease works especially well too. The strong smell draws rats in from further away than most other options.
Rats caught in a humane trap may sit for several hours before you check on them. Consider adding a small piece of fruit like an apple or orange slice alongside the main bait, which gives the rat a source of water while it waits.
Placement And Timing Matter As Much As The Trap Design
Rats are naturally cautious, and a live catch trap asks them to fully enter an enclosed space. That makes good placement even more important than usual.
Set traps along walls, fences, or other edges, since rats rely on touch and memory far more than open floor space.
Give a new trap a few days before assuming it isn’t working. Rats can take up to five days or longer to trust something unfamiliar in their environment.

Check every humane trap at least twice a day, ideally more often during hot weather. Heat and dehydration are the biggest risks to a trapped rat’s welfare.
If you’re trapping somewhere with big temperature swings, like an uninsulated shed or attic, consider checking even more frequently. Conditions inside a small trap can shift fast.
A shaded spot for the trap itself helps too, since direct sun on a metal or plastic trap can raise the temperature inside well beyond what the rat can comfortably handle.
Safety Considerations For Humane Trapping
Even without a lethal outcome, a trapped rat is a stressed animal. A few precautions help keep both you and the rat safe.
Wear gloves whenever handling a trap with a rat inside. This avoids a defensive bite and keeps your scent off the trap for future use.
Move slowly and avoid loud noises around the trap, since sudden movement or sound can cause an already stressed rat to panic further.
Rats can carry salmonella and other bacteria. Wash your hands thoroughly after handling any trap, even if you never touched the rat directly.
If you choose to relocate, transport the rat in a covered or shaded container to avoid additional heat stress during the drive.
Keep the trip as short as possible too, since the longer a rat sits in a covered container, the more heat and stress build up inside it.
Conclusion
A DIY humane rat trap can absolutely work. Doing this well means thinking past the trap itself and into what happens during and after the catch.
The wire cage box trap, the walk the plank bucket trap, the auto reset flip lid trap, the PVC pipe tunnel trap, the tip and drop tube trap, the funnel entry cage trap, and the box trap with a drop door all give you real options that avoid killing the rat outright.
Space, ventilation, checking frequency, and a clear plan for what comes after the catch matter just as much as which design you build.
Build with the rat’s welfare in mind at every step, not just the moment of capture. You’ll be doing this about as humanely as it can realistically be done.

Hi, my name is Ezra Mushala, i have been interested animals all my life. I am the main author and editor here at snakeinformer.com.