
Finding mouse droppings in a kitchen drawer, or hearing that faint scratching in the wall at night, is enough to make anyone want mice gone fast.
Store bought traps work fine, but they cost money. And a trip to the store isn’t always something you want to deal with at 11 PM. So what homemade mice traps actually work?
A few homemade mouse traps that really work are the bucket and ramp trap, the paper “X” trap, the rolling can trap, the glass and coin trap, the flip plate trap, the oiled box trap, the cardboard glue box trap, the bottle trap, the shoebox trap, the balloon trap, the toilet paper roll trap, and the classic snap trap. Each one uses cheap household items and relies on how mice actually move and explore.
These traps all lean on the same basic idea. Mice are curious, but they’re also cautious.
They tend to travel along walls rather than out in the open. Once you understand that, you can build a trap that works with their habits instead of against them.
Why Mice Behave The Way They Do
Before you build anything, it helps to know how a mouse actually experiences your house. This isn’t just trivia, it changes where you should put a trap and why some traps work so much better than others.
Mice have pretty bad eyesight. What they rely on instead is their whiskers, their sense of smell, and their hearing, and this shapes almost everything they do.

You’ll notice mice almost never walk across the middle of an open floor. Instead, they hug the edges of a room, running along baseboards, under furniture, and close to walls.
Scientists call this thigmotaxis, which just means an animal’s habit of staying in contact with a solid surface as it moves around. For a mouse, touching a wall with its whiskers and body is a way of staying safe.
It’s a way of staying hidden from anything that might be watching from above or from out in the open room.
This is also why a trap sitting in the center of your kitchen floor almost never catches anything. A mouse will walk right around it rather than over it.
Mice are also naturally wary of new objects. This is called neophobia, and it just means a fear of new things.
If you drop a brand new trap right in a mouse’s path, it might avoid it for a day or two before curiosity wins out. This is normal, and it’s one reason DIY traps sometimes take a night or two to start working.
Once you know this, a few things become obvious. Traps belong against walls, not out in the open.
And you shouldn’t give up on a trap after just one quiet night.
The Bucket And Ramp Trap Is One Of The Most Reliable Homemade Options
This is one of the most popular DIY mouse traps out there, and for good reason. It’s cheap, it’s reusable, and it can catch more than one mouse in a single night if you’re dealing with a bigger problem.
You’ll need a tall bucket (a 5-gallon bucket works well), a thin wooden dowel or a wire coat hanger, an empty soda can, and something to use as a ramp.
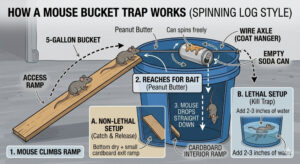
A piece of wood or even a ruler works fine for the ramp. Push the dowel through the bucket near the top rim, then slide the empty can onto it so it spins freely, like an axle.
Smear peanut butter around the can so it coats most of the surface. Then lean your ramp against the outside of the bucket so it reaches up to the rim.
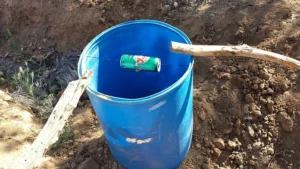
Mice will climb the ramp and reach for the peanut butter on the can. The can spins out from under their feet and drops them straight into the bucket.
Add a couple of inches of water in the bottom if you want this to be a lethal trap. Or leave it dry and add a small cardboard ramp inside if you’d rather release the mice outside later.
The main downside is that a mouse can sometimes jump back out of a bucket that isn’t tall enough. Stick with a 5-gallon size rather than something shorter.
The Paper X Trap Uses A Simple Trapdoor Instead Of A Ramp
This design solves one of the biggest problems with basic bucket traps. Mice sometimes figure out how to avoid the spinning can once they’ve seen it a few times.
You’ll need a bucket, a piece of thin paper (printer paper or a paper grocery bag works), tape, a rubber band or string, and a ramp.
Stretch the paper tightly across the top of the bucket like a drum skin. Tape or tie it down around the rim so it stays snug.
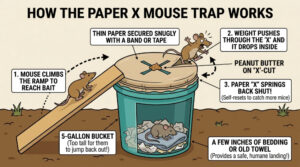
Cut a small X shape in the center of the paper, small enough that it stays closed on its own, but not stiff enough to hold a mouse’s weight.
Smear a bit of peanut butter near the center of the X, then set your ramp against the outside of the bucket.
When a mouse walks out onto the paper to reach the bait, its weight pushes through the X. It drops straight into the bucket below.
The paper springs back into place afterward, so the trap is ready to catch another mouse right away.
This is one of the more humane options on this list. The fall usually doesn’t hurt the mouse at all if the bucket has a few inches of bedding or an old towel at the bottom.
The Rolling Can Spinner Trap Works Well In Garages And Sheds
This is a close cousin of the bucket trap. Instead of a full bucket setup, it uses a bin or trash can and a length of wire strung across the top edge.
Run a wire, a wooden dowel, or even a metal rod across the top of a tall bin so it can spin. Slide an empty soda can onto it, centered so it balances evenly.
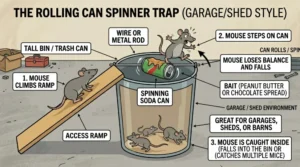
Coat the can with peanut butter or a smear of chocolate spread, then set up a ramp leading up to the rim.
The idea is exactly the same as the bucket trap. A mouse climbs up, steps onto the spinning can to reach the food, and the can rolls, dropping it inside.
This version tends to work especially well in a garage, shed, or barn. You can leave it running for several nights without checking it constantly, and it can catch multiple mice before you need to empty it.
The Glass And Coin Trap Works Great For A Single Mouse
This one is almost too simple to believe, but it works surprisingly well if you only need to catch one mouse in a small space.
All you need is a drinking glass, a coin, and a bit of bait. Peanut butter works, but a small piece of cracker or cereal is fine too.
Prop one edge of the glass up on the coin, like a tiny door slightly cracked open. Place the bait just underneath the rim, right where a mouse would have to duck under the glass to reach it.
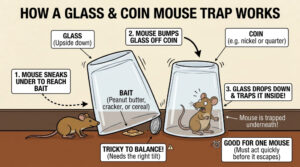
When the mouse noses its way in to grab the bait, it bumps the glass off the coin, and the glass drops down and traps it underneath.
The tricky part is getting the balance right. Too much tilt and the mouse can slip in and out without knocking the glass down.
Too little, and it won’t stay propped open at all. This trap is really only good for one mouse at a time.
You’ll need to be nearby to hear the glass fall, so you can deal with the mouse before it works out how to tip the glass back up.
The Flip Plate Trap Resets Itself After Every Catch
If you don’t want to keep rebuilding a trap after every catch, this design solves that problem better than most.
You’ll need a 5-gallon bucket, a sturdy plate (a Styrofoam plate or a piece of stiff plastic works well), a wire coat hanger, two support sticks, peanut butter, and a couple inches of water.
Drill two small holes on opposite sides of the bucket, close to the rim. Cut the straight section off the coat hanger and feed it through one hole.
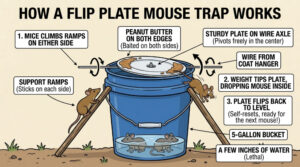
Thread it through the center of the plate, then out through the other hole.
Add two or three inches of water to the bottom of the bucket. Then prop a stick on each side so mice have an easy path up to the rim.
Smear peanut butter on both edges of the plate, since it needs bait on each side to keep working after every catch.
A mouse walks out onto the plate, and its weight tips the plate down on that side, dropping the mouse into the bucket. The plate then flips back to level on its own, baited and ready for the next mouse.
This is one of the more clever designs here, since it can keep catching mice all night without you needing to reset anything by hand.
The Oiled Box Trap Uses A Slippery Wall Instead Of A Trapdoor
This design skips ramps and trapdoors completely and instead relies on a wall that’s simply too slick to climb.
Grab a tall, smooth sided container, like a large plastic tote or a deep bin. Coat the inside walls with a thin layer of cooking oil, going up about two thirds of the way from the bottom.
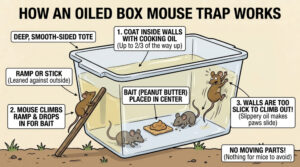
Lean a ramp or a stick against the outside so mice can climb up and in. Then place bait, ideally peanut butter, in the center of the container floor.
A mouse can climb the ramp just fine. But once it’s inside and tries to climb back out, its paws just slide on the oiled walls.
This trap works especially well for mice that have already gotten wise to spinning cans or trapdoors. There’s no moving part for them to learn to avoid.
The only downside is cleanup. Oil gets messy, and you’ll want an old container you don’t mind coating and eventually tossing out.
The Cardboard Box And Glue Trap Enclosure Keeps Things Out Of Sight
This one is a good option if the idea of an open glue trap sitting out in your kitchen makes you uneasy, since kids and pets can find those just as easily as mice can.
Take an ordinary cardboard box and cut the bottom off, so you’re left with an open sided tunnel with four walls and a top.
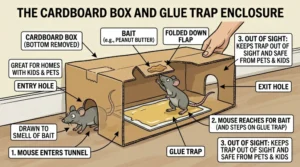
Cut a small entry hole in one end and an exit hole in the opposite end, low enough for a mouse to walk through comfortably.
Place a standard glue trap on the floor inside the box, roughly in the middle, between the two openings.
Cut a small flap out of the cardboard above the glue trap and fold it down so it hangs just above the sticky surface, then smear peanut butter on the underside of that flap.
A mouse enters the tunnel, smells the bait, and reaches up or stretches toward the flap to get at it. In doing that, it loses its footing and steps down onto the glue trap below.
The enclosed design means you never have to see or touch the mouse directly. It also keeps curious pets and kids from ever reaching the glue trap itself.
The Bottle Trap Uses A One Way Entrance
This is a smaller, more portable option. It’s a good one if you want something you can set inside a cabinet or a tight space where a bucket won’t fit.
Take a clean 2-liter plastic bottle and cut off the top third, right where the bottle starts to taper.
Flip that cut off top piece around and push it back into the bottom section, like a funnel pointing inward. This creates a narrow opening that’s easy to walk into but hard to climb back out of.
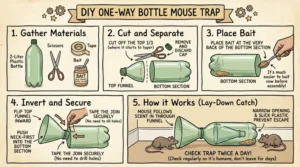
Tape the two pieces together so the top stays in place. Then put a bit of bait, like peanut butter or a piece of dry cereal, at the very back of the bottle.
A mouse follows the scent in through the funnel, but once it’s inside, the narrow opening and the slick plastic make it very hard to climb back out.
This trap is humane if you check it regularly. Some mice are able to chew through the plastic over time, though.
It’s not meant to be left alone for days at a stretch.
The Shoebox Trap Is Easy To Build With Kids Around The House
If you want something that costs almost nothing and takes just a few minutes, this one’s hard to beat. It’s simple enough that older kids can help build it.
Grab an old shoebox with a lid, and cut a hole in the top of the lid, roughly the size of a golf ball.
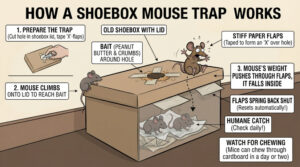
Cut two flaps out of stiff paper or thin cardboard and tape them so they form an X over the hole. It’s the same idea as the paper X trap, just built into the shoebox lid instead of stretched over a bucket.
Put a few cracker crumbs and a very light smear of peanut butter around the hole, not so much that it weighs the paper flaps down.
Put the lid on the box and set the whole thing in a spot where you’ve noticed mouse activity, ideally against a wall.
A mouse climbing across the lid to reach the bait will fall through the flaps and land inside the box. The flaps close again behind it.
The one thing to watch for is that mice can chew through cardboard fairly quickly. This works best as a short term trap you check within a day or two, not something you leave running for a week.
The Balloon Trap Is Simple But Can Be Inconsistent
This is about as bare bones as homemade mouse traps get, and it only needs two things: a bucket and an inflated balloon.
Inflate a balloon partway, just enough that it stretches over the top rim of a bucket like a loose cover. Tape or tie the edges down so it stays in place.
Add a bit of bait on top of the balloon, right in the center where the surface has the least support underneath it.
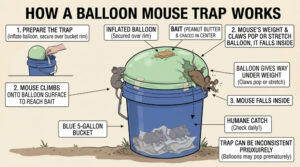
When a mouse steps onto the balloon to get the bait, its claws often pop it. Or the balloon just gives way under the weight, and the mouse drops into the bucket.
The downside here is real. Mice have pointed little claws, and a balloon can pop the moment a mouse so much as taps it.
That sends the mouse running before it ever really commits to the trap. Some balloons hold up better than others depending on the thickness of the rubber.
This one works better as a backup option than a primary trap.
The Toilet Paper Roll Trap Is A Quick Fix For A Light Infestation
This one gets passed around online a lot because it’s almost too simple to believe. It really does work for a night or two before mice catch on.
Balance an empty toilet paper roll or paper towel roll on the edge of a table or counter. About half of it should hang off into open air, right over a bucket or bin placed below.
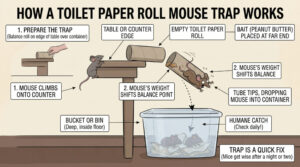
Put a bit of peanut butter inside the far end of the tube, the end that’s hanging out over the edge.
A mouse climbing into the tube to reach the bait shifts the balance point as it moves further in. The whole tube tips over the edge and drops the mouse into the container below.
This works because mice climb into tunnels and tubes readily. It’s part of how they naturally move through tight spaces to stay hidden.
The catch is that this trap really only works well for a night or two in the same spot. Mice that see others get caught, or that manage to escape once, tend to get suspicious of the setup fairly quickly.
The Classic DIY Snap Trap Still Belongs On This List
Not every homemade trap has to reinvent the wheel. Building your own version of a classic snap trap is still one of the most dependable methods out there.
Exterminators have said for years that the basic spring loaded design is hard to beat for reliability. It also costs very little to put together or buy in bulk.
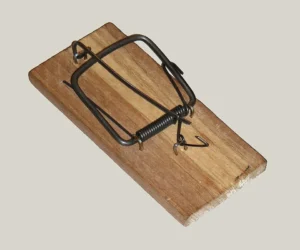
If you want to build one from scratch, you’ll need a small wood block, a strong spring or heavy rubber band, and a stiff wire for the trigger and hammer bar. You’ll also need a way to anchor everything so the trigger releases the hammer bar cleanly.
This isn’t a beginner project the way the bucket trap is. If a fully DIY spring trap sounds like too much work, buying a basic snap trap for around a dollar does the same job.
Pair it with the bait tips further down, and it still costs less than most of the newer trap designs on the market.
Keep in mind that snap traps are lethal and have real force behind them. Always keep them away from small kids and pets, and set the trigger facing the wall for the best results.
Choosing The Right Bait Actually Matters More Than People Think
You can build the best trap on this list, and it still won’t catch anything if the bait is wrong or if you use too much of it.
Peanut butter is the most reliable bait, and for a simple reason. It’s sticky, it smells strong, and a mouse has to work at it rather than just grab a piece and run.
That’s exactly the kind of bait that trips a trigger or forces a mouse to fully commit its weight to a trap.
Chocolate works nearly as well, since mice are drawn to sweet, high calorie food just like we are. A tiny piece of milk chocolate or even a small chunk of a peanut butter cup tends to work very well.
Bacon, dry pet food, and sunflower seeds are all solid backup options. They’re especially useful if a mouse in your house seems to be ignoring peanut butter, which does happen sometimes.
Cheese, despite what cartoons have taught all of us, is actually one of the weaker choices. Mice aren’t especially drawn to it compared to fattier, sweeter food.
The myth mostly comes from old stories about how cheese used to be stored out in the open centuries ago.
One option people often miss is nesting material. In cooler months especially, a small tuft of cotton, yarn, or dental floss can outperform food bait completely.
That’s because female mice are actively gathering soft material to build nests during fall and winter.
Whatever bait you choose, use less than you think you need. A pea sized amount is enough, since too much bait lets a mouse nibble around the edges without ever triggering the trap.
Where You Put The Trap Changes Everything
You could have the best trap and the best bait and still catch nothing if you set it in the wrong spot.
Since mice travel along walls, place traps directly against baseboards, in corners, and behind furniture rather than out in open floor space.
Look for the signs of where mice have actually been active. Droppings, small gnaw marks on boxes or wood, and greasy little smudge marks along baseboards (from the natural oils on their fur) are all good clues.
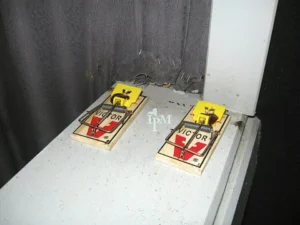
Kitchens, pantries, laundry rooms, and garages tend to be the most common trouble spots, especially anywhere food or nesting material is easy to find.
If you’re dealing with more than one or two mice, it helps to set multiple traps a few feet apart along the same wall. Don’t rely on just one trap to solve the whole problem.
Check your traps daily, both to reset any that have been triggered and to avoid leaving a caught mouse for too long. This matters for hygiene, and if you’re using humane traps, it matters for the animal’s wellbeing too.
Safety Tips You Shouldn’t Skip
A few basic precautions go a long way, especially if you have kids or pets in the house.
Keep any lethal trap, especially a spring loaded one, out of reach of small children and curious pets. A snapped trap can pinch a small finger or a paw hard enough to cause real pain.
Wear gloves when setting or emptying traps. This keeps your scent off the trap (which can make mice more cautious) and protects you from bacteria a mouse might be carrying.
Mice, like most rodents, can carry bacteria such as salmonella in their droppings and urine. Wash your hands thoroughly after handling any trap, and clean the area around a catch with a disinfectant rather than just wiping it up dry.
If you’re using a humane trap and releasing mice outside, release them well away from your home. Ideally a few hundred yards out, or they’ll likely just find their way back inside.
Conclusion
Homemade mice traps really can work just as well as anything you’d buy at the store. You just need to understand a little bit about how mice actually move and think.
The bucket and ramp trap, the paper X trap, the rolling can trap, the glass and coin trap, the flip plate trap, the oiled box trap, the cardboard glue box trap, the bottle trap, the shoebox trap, the balloon trap, the toilet paper roll trap, and the classic DIY snap trap all give you a solid range of options.
Pick whichever fits what you have on hand, and whether you want a humane release or a more permanent solution.
Good bait, smart placement along walls, and a bit of patience matter just as much as the trap design itself. Mice are cautious animals, and it can take a night or two before one commits to investigating something new.
Stick with these basics and check your traps daily. Keep a few safety habits in mind, and you’ll have a much easier time getting your home mouse free without spending a dime at the hardware store.

Hi, my name is Ezra Mushala, i have been interested animals all my life. I am the main author and editor here at snakeinformer.com.