
Buying a live rat trap can cost anywhere from 20 to 60 dollars, but if you need a quick solution or want to save money, you can make your own trap at home.
You probably have most of the materials you need already, and building your own trap is simpler than you might think. How do you make a live rat trap?
You can make a simple live rat trap using a bucket, a ramp, a spinning bottle or dowel, and some bait. The rat walks up the ramp onto the spinning bottle to get the bait, the bottle spins, and the rat falls into the bucket where it can’t escape. This design is cheap, effective, and reusable.
This is just one design, and there are several other homemade trap options you can build. Let’s look at different DIY trap designs and how to build them step by step.
The Bucket and Bottle Trap
This is the most popular homemade rat trap design because it works really well and uses simple materials you probably already have.
You’ll need a 5-gallon bucket, a long stick or dowel, a plastic bottle, some wire, a piece of wood for a ramp, and bait.
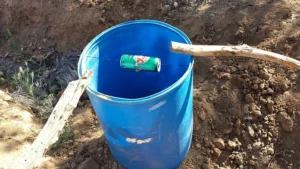
The basic idea is that the rat climbs the ramp to get to the bottle, which has bait on it. When the rat steps on the bottle, it spins and drops the rat into the bucket.
Once in the bucket, the rat can’t climb out because the sides are too smooth and tall. You can catch multiple rats with this trap before emptying it.
Materials You’ll Need for the Bucket Trap
Here’s a complete list of what you need. A 5-gallon bucket (the kind you can get from hardware stores or that paint comes in).
A wooden dowel or long stick that’s slightly longer than the diameter of the bucket. It needs to be about 14 to 16 inches long.
A plastic water bottle or soda bottle. A 16-ounce or 20-ounce bottle works well. Make sure it’s empty and clean.
A piece of wire or coat hanger to thread through the bottle and attach it to the stick.
A piece of wood or thick cardboard to use as a ramp. It should be long enough to reach from the floor to the top of the bucket.
And of course, you’ll need bait. Peanut butter works best for this trap design.
Building the Bucket Trap Step by Step
Start by drilling or punching two small holes on opposite sides of the bucket, near the top rim. These holes need to be big enough for your dowel to fit through.
Thread the dowel through both holes so it sits across the top of the bucket like a bridge. The dowel should spin freely.
Now take your plastic bottle and punch or drill a hole through the center of the bottle, from the bottom to the cap. The hole should go straight through the middle.
Slide the bottle onto the dowel. The bottle should be able to spin freely on the dowel without falling off.
Smear peanut butter on the middle of the bottle. This is your bait and it’ll make the rat walk onto the bottle.
Setting Up the Ramp
Lean your wooden ramp against the side of the bucket so it reaches the top rim. Make sure it’s stable and won’t slip.
The ramp should create an easy path for the rat to climb up to the bucket’s edge. From there, the rat will see the peanut butter on the bottle.
You can secure the ramp with tape or by nailing it to something stable. You don’t want it to slide around and scare the rat away.
Some people put a little trail of peanut butter on the ramp to encourage rats to climb up. This works, but it’s not necessary.
How the Bucket Trap Works
When the rat climbs up the ramp, it’ll smell the peanut butter on the bottle. The rat will try to walk across the dowel to reach the bottle.
As soon as the rat steps onto the bottle, the bottle spins because it’s not secured to the dowel. The rat loses its balance and falls into the bucket.
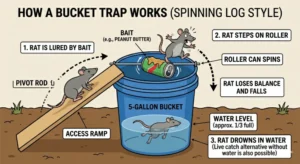
The smooth plastic sides of the bucket are too slippery for the rat to climb out. It’s trapped but unharmed.
You can catch multiple rats this way because the trap resets itself after each catch. Just add more peanut butter to the bottle as needed.
Adding Water to the Bucket (Optional)
Some people put a few inches of water in the bottom of the bucket. This drowns the rats, turning the live trap into a kill trap.
If you’re using this as a live trap, don’t add water. The rats will just sit in the bucket until you release them.
Water is only necessary if you want to kill the rats. Many people prefer the humane approach and release the rats far from their homes.
If you do use water, make sure it’s deep enough that the rat can’t stand with its head above water. About 4 to 6 inches should work.
The Tube Trap Design
Another simple homemade trap is the tube trap. This one uses a cardboard tube, a lightweight board or piece of cardboard, and a bucket or trash can.
You’ll need a paper towel tube or toilet paper tube (or any cardboard tube), a lightweight flat surface like cardboard, and a tall container.
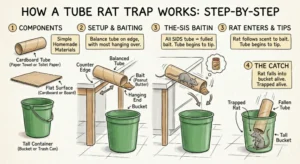
Balance the cardboard tube on the edge of a counter or table, with most of the tube hanging over the edge. Put bait at the far end of the tube.
Place a bucket or trash can on the floor directly under the hanging end of the tube. When the rat crawls into the tube to get the bait, the tube tips over.
Building the Tube Trap
Cut a paper towel tube or toilet paper tube so it’s about 8 to 10 inches long. The tube needs to be long enough to balance on the edge of a surface.
Put peanut butter or another sticky bait at one end of the tube. This should be a generous amount because it also adds weight to that end.
Balance the tube on the edge of a counter, table, or shelf. Most of the tube should hang over the edge, with just a small portion resting on the surface.
The bait end should be the end hanging over the edge. When the rat walks into the tube from the surface, its weight tips the tube over.
How the Tube Trap Works
The rat climbs onto the counter or table and finds the tube. It smells the peanut butter and crawls inside to get it.
When the rat gets far enough into the tube, its weight shifts the balance. The tube tips forward and falls into the bucket below.
The rat and the tube land in the bucket together. The rat can’t climb out because the bucket is too deep.
This trap is single-use per setup, meaning you have to reset it after each catch. But the materials are so cheap that this doesn’t really matter.
The Seesaw Trap Variation
You can modify the tube trap into a seesaw design. Instead of having the tube hang over an edge, you balance it in the middle on a small pivot point.
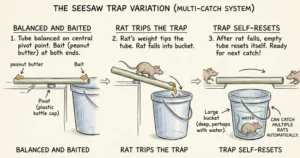
Put bait on both ends of a longer tube or board. Balance it in the middle on something narrow like a bottle cap or dowel.
When a rat walks onto one end, that end tips down into a bucket. After the rat falls off, the trap resets itself automatically.
This version can catch multiple rats without needing to be reset manually. It’s a bit more complex to build but more efficient.
The Box Trap with a Prop Stick
This is an old-fashioned trap design that’s been used for hundreds of years. It’s simple but effective.
You’ll need a box (cardboard or wooden), a stick, some string, and bait. The box should be big enough to cover a rat completely.
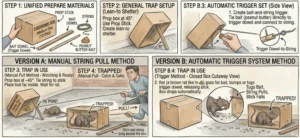
Prop up one edge of the box with the stick. Tie string to the stick and attach bait to the string inside the box.
When the rat tugs on the bait, it pulls the string, which knocks over the stick. The box falls and traps the rat underneath.
Setting Up the Box Trap
Find a box that’s at least 12 inches on each side. It needs to be big enough to trap an adult rat completely.
Prop up one edge of the box with a stick. The stick should be about 6 to 8 inches long and positioned at an angle.
Tie string to the middle of the stick. Thread the string under the box and attach bait to the end inside the box.
The setup should be delicate enough that when the rat pulls the bait, it moves the string and knocks over the stick.
Issues with the Box Trap
The box trap works, but it has some problems. First, you have to be there to check it constantly because the rat is just sitting under the box.
If you don’t check it quickly, the rat might chew through a cardboard box and escape. You’d need a wooden box for better security.
Also, releasing the rat from under the box is tricky. You’ll need to slide something under the box to trap the rat inside, then carry the whole thing outside.
This design is good for emergencies but isn’t as practical as the bucket traps for long-term use.
The Walk the Plank Trap
This design is similar to the bucket trap but uses a flat board instead of a spinning bottle. It’s even simpler to build.
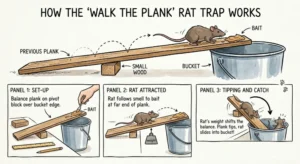
You’ll need a bucket, a long board or thick cardboard, and something to balance the board on (like a small block of wood).
Balance the board across the top of the bucket with most of the board hanging over one side. Put bait at the far end of the board.
When the rat walks out onto the board to get the bait, the board tips and dumps the rat into the bucket.
Building the Walk the Plank Trap
Place a small block of wood or a thick book on the edge of the bucket. This will be your pivot point.
Lay a board across this pivot point. Most of the board should extend over the bucket, with just a small portion resting outside the bucket.
Put bait at the very end of the board that’s hanging over the bucket. Use something sticky like peanut butter so it stays in place.
When the rat walks onto the board to reach the bait, its weight tips the board forward and the rat slides into the bucket.
Advantages of Homemade Traps
Building your own trap saves money. You can make several traps for the price of one store-bought trap.
You can customize the size to fit your space. Need a smaller trap for tight areas? Just use a smaller bucket or box.

Homemade traps are reusable. Unlike glue traps or snap traps that you throw away, bucket traps can catch dozens of rats.
You probably have most of the materials already. This means you can build a trap right now without going to the store.
Disadvantages of DIY Traps
Homemade traps aren’t always as reliable as store-bought traps. The design might not work perfectly, and you might need to adjust it.
They can be less durable. A cardboard tube trap won’t last as long as a metal cage trap.
Some designs require more maintenance. You need to check and reset them more often than commercial traps.
If you’re not handy, building a trap might be frustrating. Store-bought traps are ready to use right out of the package.
Choosing the Right Bait for Homemade Traps
Peanut butter is the best bait for most homemade traps. It’s sticky, smells strong, and rats love it.
Use about a tablespoon of peanut butter. Spread it on the bottle, tube, or board depending on your trap design.
Other good options include chocolate, bacon, dried fruit, or nuts. Whatever you use, make sure it has a strong smell.
Replace the bait every few days if you’re not catching anything. Fresh bait works better than old, dried-out bait.
Where to Place Your Homemade Trap
Put your trap where you’ve seen rat activity. Look for droppings, gnaw marks, or greasy rub marks on walls.

Rats travel along walls, so place your trap against a wall if possible. This makes rats more likely to find it.
Don’t put traps in the middle of open rooms. Rats avoid open spaces where they feel exposed.
Good locations include behind appliances, in corners, in basements, attics, or garages. Anywhere dark and quiet is ideal.
Making Your Trap More Effective
You can make homemade traps work better by adding a scent trail. Put small bits of peanut butter leading up to the trap.
This creates a path for rats to follow. When they get to the trap, they find even more food.
Leave the trap unset for a day or two first. Let rats eat the bait safely so they learn to trust the trap.
After they’re comfortable, set it up properly. They’ll be more likely to walk right into it.
Safety Tips for DIY Traps
Wash your hands after handling traps or materials. Rats can carry diseases, and you don’t want to spread bacteria.
If you have pets or kids, put traps where they can’t reach them. Even though these are live traps, you don’t want pets or children falling into buckets.
Check your traps at least twice a day. Rats can die from stress or dehydration if left trapped too long.
Wear gloves when emptying traps or handling caught rats. This protects you from bites and diseases.
What to Do with Caught Rats
Once you catch a rat, you need to decide what to do with it. Many people drive the rat at least a mile away and release it in a wooded area.
Don’t release rats near other people’s homes or in city parks. This just moves your problem to someone else.
If you prefer to kill the rat, check your local laws about humane methods. Some areas have rules about how to euthanize rodents.
After releasing or disposing of the rat, clean your trap thoroughly. Wash it with soap and water before using it again.
Improving Your Trap Over Time
If your first trap doesn’t work well, don’t give up. Make adjustments based on what happens.
If rats are eating the bait without getting caught, move the bait further away from the entry point. Make them commit to entering the trap.
If the trap isn’t triggering, make the mechanism more sensitive. This might mean using a thinner stick or lighter materials.
Try different trap designs if one isn’t working. The bucket trap works best for most people, but other designs might work better in your situation.
Conclusion
Making a live rat trap at home is easy and cheap using a bucket, ramp, spinning bottle, and bait. This design catches rats humanely without expensive equipment.
The bucket trap is the most effective homemade design because it can catch multiple rats and resets itself automatically. Other designs like the tube trap or box trap also work but require more maintenance.
Use materials you already have at home to save money. Position your trap where you’ve seen rat activity, use peanut butter as bait, and check the trap at least twice daily.
Homemade traps are a practical solution for small to medium rat problems. For large infestations, consider combining DIY traps with professional pest control services.

Hi, my name is Ezra Mushala, i have been interested animals all my life. I am the main author and editor here at snakeinformer.com.